- The camera I recommend to most new photographers is not a Nikon or Sony - and it's on sale
- My favorite SSH clients for Android - and why you need them
- Opening doors to cybersecurity careers with Splunk and Per Scholas
- ISACA Barcelona president warns of quantum illiteracy
- Uyghur Diaspora Group Targeted with Remote Surveillance Malware
Pondering Automation: Who Wants Storage? You Do!

Howdy out there in automation land! It has been 1 year…. 1 year exactly since my last blog. I do apologize to the readers but with the year we’ve had, I am sure you understand. A lot of change in our work environments, a lot of change in our world. However, Pondering Automation is back and in a new place/home. This blog will move to the developer blogs section of cisco.com now and will be here for the duration!
Summer is here and I hope everyone has the chance to step back, take some time, have a vacation, do whatever makes you feel good. You know what makes me feel great? Automation, Orchestration, and making our lives’ easier! Pondering Automation has been backed with Python, Cisco Process Orchestrator, and Action Orchestrator throughout its multi-year past… but now we are moving on to SecureX Orchestration! And since we are bringing in some new readers and starting some new(er) beginnings, maybe our movie poster should be….
A movie I have not seen yet but appropriate for today’s “restart” of the blog… no? So great, we are back… what do I have for you today? Well today we are going to cover a handful of things and solve a use-case while using SecureX Orchestration or SXO. SXO resides in our SecureX platform and is located in the public cloud. You are saying… “that is great! Software as a service!”… but then you are also thinking… “how do I get to my on-premise components?” Well, the answer for you is the SXO Remote!
Now this is not a blog focused on the Remote… but you will need the remote for the blog. You can find some outstanding documentation on the remote, its setup, and more on the SecureX Documentation Git. What we are going to do today, instead, is we are going to solve this problem: I need to use a database with my SXO automations and I want that database to be on-prem… how do I do that with the pieces we have today? Well… let me show you! Does this only have to relate to a Security automation or use-case? No. This is purely a generic use-case in nature and could be applied to any and all automations you want to do with SXO… the possibilities are limitless for such a great product. Apologies if this looks like a recipe… I do love to cook. And after I show you all the goodness… I also have a bunch of atomics pre-build for this setup that I am going to share with you 
What you will need…
- SecureX Orchestration
- SecureX Orchestration Remote that is already connected (see above Git for steps/videos)
- An on-prem Linux Virtual Machine – I prefer using CentOS and will write based on that
- About 30 minutes to deploy and connect
How To Steps….
MongoDB
I are assuming you have SXO and your SXO Remote is connected. I am also assuming you have a VM ready to be your DB. First, we will select MongoDB as our DB of choice and we will need to install it to our VM.
- Personally I like to disable the firewall first, but up to you… if so you can disable via
systemctl disable firewalldor you can punch holes in it if you like. - Next we want to update our yum repos via
yum -y update - Now we need to include Mongos repo. We are going to create the repo file via
vi /etc/yum.repos.d/mongodb-org.repoand we will use Mongo 4.4 , so you can use this as your repo configuration:[mongodb-org-4.4]
name=MongoDB Repository
baseurl=https://repo.mongodb.org/yum/redhat/$releasever/mongodb-org/4.4/x86_64/
gpgcheck=1
enabled=1
gpgkey=https://www.mongodb.org/static/pgp/server-4.4.asc - You can verify this with
yum repolistand then install mongo viayum install -y mongodb-org - We will be using the default directories so a default install is just fine. If you wish to use different directories then follow the Mongo documentation linked above to do such.
- Turn off SELinux if you can via
setenforce 0and then permanently viased -i 's/^SELINUX=enforcing$/SELINUX=permissive/' /etc/selinux/config - Edit your mongo configuration file via
cat /etc/mongod.conf, change thebindIpfrom127.0.0.1to0.0.0.0to allow for other hosts to connect - Enable mongo via
systemctl enable mongodand then start it viasystemctl start mongod. Verify the service viasystemctl status mongod - You can create a user by going into mongo via
mongoat the command line. - You can then use this line to create an administrator user with user name
adminand passwordCisco
use admin
db.createUser(
{	user: "admin",
	pwd: "Cisco",
	roles:[{role: "userAdminAnyDatabase" , db:"admin"}]})
RestHeart – API Layer
Now mongoDB is installed. We need to add a Rest API layer on top of it so we can use the remote and SXO to talk to the DB. To add our Rest API layer, we will use RestHeart. This is an opensource/free project that will add the API layer. It is not the only one out there but I found it to be super easy to configuration, use, and is highly responsive. This setup of Rest API over DB can be done across many DBs (mongo, mySQL, Oracle, etc) and with many Rest API servers. So let’s follow the setup to install it…
- Make an install directory via
mkdir -p restheart - You will need to install java if you do not already have it. The most current version of restheart uses Java 16, so you would need to run
yum install java-16-openjdk-devel-y. You can verify it viajava -version. If you don’t see 16, maybe you see 8 or 11 or an older version here. To set your version, you will need to then runalternatives --config javaand select the number that matches version 16. - Download restheart via
wget https://gitreleases.dev/gh/SoftInstigate/restheart/latest/restheart.tar.gz. And expand the tar viatar -xzf restheart.tar.gz - You should edit the
default.propertiesin theetcfolder inside of restheart. - You can change whatever you like inside of this configuration file, but the big one to point out is to change the
root-mongo-resourceto'*'and this will give it access to all of your DBs in mongo. - To start restheart in the background run the following command:
java -jar restheart.jar --fork etc/restheart.yml -e etc/default.properties - The default users are in the
etc/users.ymlfile and we will use the base default which is user:adminand password:secret - You can make a couple curls to test restheart.
- First, we will create a DB via
curl --user admin:secret -I -X PUT localhost:8080/BlogTest - Next we will create a collection via
curl --user admin:secret -I -X PUT localhost:8080/BlogTest/Demo - Lastly we will insert some data to the collection via
curl --user admin:secret -H "Content-Type: application/json" -X POST localhost:8080/BlogTest/Demo -d '{"some": "test", "for": "blog"}'
Integration with SXO
- Now we have our DB setup and listening to our API requests! We can use a simple HTTP Request call in SXO to do DB work.
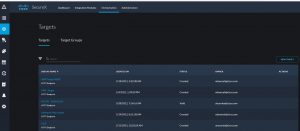
- First let’s create a target. Go to the targets menu and select to create a new target.

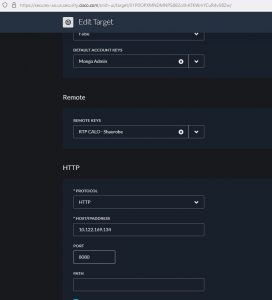
- You will need to create a new account keys and it should be the *RestHeart* API user, not the MongoDB user. It is basic authenication.
- Select your Remote for SXO.
- Input your
host IP or addressof the on prem VM. Use Port8080if you are using the default for RestHeart. UseHTTPunless you changed that on RestHeart. No path is needed.
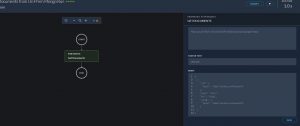
- Now we will create a new test workflow, so go back to the workflows area and click
New Workflow - Search for the
HTTP Requestactivity and drag and drop it to your canvas. Select your mongoDB rest API target as the target. - Set the
relative URLtoBlogTest/Demoor basically<DB>/<Collection> - Set the
MethodtoGETandContent TypetoJSON - Validate and run your workflow. You should see the sample data we inserted earlier on! You have now queried an on-prem DB from the SXO cloud!

To help you guys, I have a few things to give you… one is 13 atomic workflows to use on this setup! So if you like this and want to use Mongo(I know I will) in SXO, then you can use the MongoDB-RestHeart atomics found on the public CX Workflow git. Please note: These workflows are “opensource” in nature and have no support. However if you find a bug… let me know!
Lastly… as with all of my blogs, there is a video of me doing it… sooooo
Onto the Video!
Link: The House that Automation Built-20210607 1920-1
Pass: DbmBBCe3
Standard End-O-Blog Disclaimer:
Thanks as always to all my wonderful readers and those who continue to stick with and use CPO and AO! I have always wanted to find good questions, scenarios, stories, etc… if you have a question, please ask, if you want to see more, please ask… if you have topic ideas that you want me to blog on, Please ask! I am happy to cater to the readers and make this the best blog you will find 
AUTOMATION BLOG DISCLAIMER: As always, this is a blog and my (Shaun Roberts) thoughts on CPO, AO, SXO, orchestration, development, devops, and automation, my thoughts on best practices, and my experiences with the products and customers. The above views are in no way representative of Cisco or any of it’s partners, etc. None of these views, etc are supported and this is not a place to find standard product support. If you need standard product support please do so via the current call in numbers on Cisco.com or email tac@cisco.com
Thanks and Happy Automating!!!
— Shaun Roberts, shaurobe@cisco.com
Related resources
We’d love to hear what you think. Ask a question or leave a comment below.
And stay connected with Cisco DevNet on social!
Twitter @CiscoDevNet | Facebook | LinkedIn
Visit the new Developer Video Channel

