- Fire TV just got three new accessibility features for people with disabilities
- 6 ways to deal with mental fatigue at work
- Interpol Calls for an End to “Pig Butchering” Terminology
- Capital Energy se alza con el premio Energía y Utilities en los ‘CIO 100 Awards’
- “인도가 발전하려면 주 70시간 근무 시행해야…” 인포시스 설립자 발언
How to inventory server hardware with PowerShell

Most of us have dealt with hardware that stays in service well past its planned end-of-life date or that, for reasons of budget and bureaucracy, doesn’t even make it into service until well into its lifespan.
Step one in planning and prioritizing server-hardware upgrades is inventorying and evaluating your existing hardware, which may seem like an appropriate job for an IT intern, it’s also a perfect job for PowerShell.
Read system telemetry with PowerShell
The primary PowerShell cmdlet throughout this discussion is Get-WmiObject. Most server admins will have at least a passing familiarity with Windows Management Interface (WMI), a set of telemetry points to help monitor performance and server health, among other things. WMI is frequently used to filter the application of Group Policy Objects to only those computers that meet a specific set of criteria. WMI is Microsoft’s implementation of Common Information Model (CIM), which is an industry standard. The Get-WmiObject cmdlet is able to access both WMI and CIM classes.
PowerShell also offers the Get-CimInstance cmdlet, which is functionally similar to Get-WmiObject but with a couple of key differences. Specifically, Get-WmiObject uses Distributed Component Object Model (DCOM) to communicate with remote computers, while Get-CimInstance uses PowerShell Remoting/Windows Remote Management (WinRM). There are some technical differences in terms of protocols, but the key functional difference is that WinRM requires some setup on the remote computer ahead of time.
Frequently the hardest part of using WMI is finding the right class to use. Running Get-WmiObject with the -List parameter will return over a thousand classes to choose from, but to limit this to fewer than 25, you can use this:
Get-WmiObject -List | Where-Object Name -like *processor*.
One nice benefit of Get-WmiObject is that the -ComputerName parameter accepts multiple hostnames, which means you can easily pull information from a list of systems with very little effort. That could be a hard-coded list of hostnames, a selection extracted from a text file, or a list of computer names pulled from Active Directory.
Get server CPU details
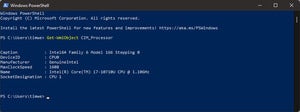
The CIM_Processor class can deliver CPU-related information, but as with many other PowerShell cmdlets, Get-WmiObject isn’t super forthcoming by default. Executing the command
Get-WmiObject CIM_Processor
returns a mere half dozen details as in this screen capture (click to expand):
 Tim Ferrill
Fortunately gathering additional information from the cmdlet is trivial by leveraging the Select-Object cmdlet.
The Get-WmiObject CIM_Processor | Select-Object * command takes the output of Get-WmiObject, even those fields not displayed automatically, and returns the entire set. For practical use that’s probably more information than is really useful, so use this as a starting point and scale things back to the specific fields you truly care about.
There are some key processor-performance metrics that are universal (clock speed, number of cores or threads, cache details) regardless of CPU manufacturer, family, or even architecture. WMI enables access to each of these values, which makes them accessible programmatically using Get-WmiObject. Additionally, servers often have multiple CPUs, which makes identifying the socket–the physical location of the CPU on the motherboard–a key piece of information.
Here is what a command looks like to list a specific set of details for server CPUs:
Get-WmiObject CIM_Processor | Select-Object PSComputerName, Name, DeviceID, SocketDesignation, ProcessorType, MaxClockSpeed, NumberOfCores, ThreadCount, L2CacheSize, VirtualizationFirmwareEnabled
Detail system memory
The steps for reading system-memory details are similar to those for reading processor information, although memory is even more likely to have multiple hardware components. Even entry level servers with a single CPU could potentially have several memory modules. This isn’t necessarily critical when extracting details for a single server but can become important when performing a bulk inventory and you want that information stored or displayed in a particular way. For instance, if your intent is to have a spreadsheet you can analyze, do you want to show details for each memory module, or summary data for system memory as a whole?
If you use the techniques above and pull a list of WMI classes with ‘memory’ in the name, you’ll see several possible candidates, but CIM_PhysicalMemory is the best choice for the moment. You might be interested to check out CIM_Memory and CIM_AssociatedProcessorMemory later, as both of these get into processor cache memory. In terms of initially pulling system memory details, let’s skip ahead and assume you’ve already pulled a list of all the details available from the CIM_PhysicalMemory class using something that resembles the following command:
Get-WmiObject CIM_PhysicalMemory | Select-Object BankLabel, Manufacturer, PartNumber, SerialNumber, Capacity, Speed, ConfiguredClockSpeed, ConfiguredVoltage
As with the processor details we pulled earlier, this provides a listing of go-to details commonly used to define the performance capability of system memory. This list is certainly not all-inclusive and can be tailored to your needs fairly easily.
Now if a list of each memory module meets your inventory needs then great, you’re pretty much done. But just for fun let’s assume you’d rather have a summary of the system memory, capturing just the overall capacity and the number of physical memory modules contained in your server. For this we can use the Measure-Object cmdlet to both count the number of physical memory devices and calculate the total sum of the capacity:
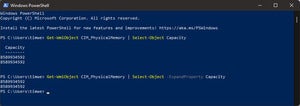
$ramSummary = Get-WmiObject CIM_PhysicalMemory | Select-Object -ExpandProperty Capacity | Measure-Object -Sum
As you can see, we’re assigning the results of this command primarily to a variable—a unit of memory for storing values—in this case $ramSummary. So we can easily get to both the count and the sum after we’ve executed the command. We’ve already talked about both the Get-WmiObject and Select-Object cmdlets, though the -ExpandProperty parameter isn’t something we’ve covered before. As shown below (click to expand), -ExpandProperty converts the result from an object with a name displayed as a column header (in this case Capacity) and values, into just a list of the values, (in this case 8589934592).
 Tim Ferrill
For the purposes of this exercise this is key because we feed the list of values into the Measure-Object cmdlet. Note that Measure-Object provides a count by default, that detail is implied, however we have to specify that we also want a sum. Additional flags can be specified in order to retrieve an average, maximum, minimum, or other measures (potentially dependent on what sort of information is fed into the cmdlet).
Because we defined the $ramSummary variable we can access the count and sum as properties of the variable: $ramSummary.Count and $ramSummary.Sum. The unit of measure initially returned by the CIM_PhysicalMemory class for the memory capacity is in bytes, so it’s very likely you’ll want to display a value as something a little more readable. There are a couple of ways you can do this, simply dividing the result by 1024 three times will get you to gigabytes, but a more elegant method is to use PowerShell constants to simply convert the number into gigabytes using something like $ramSummary.Sum / 1GB.
TPM info for security
Security is a huge factor in modern networks, particularly as virtual machines and containers increase system density. Trusted Platform Modules (TPM’s) are key to Windows security capabilities like BitLocker disk encryption. Like Windows 11, installing Windows Server 2022 will require a TPM 2.0 chip.
Naturally there is a WMI class you can use to retrieve some TPM-related information, but there’s also a dedicated cmdlet that lets you do more than just check for availability and status. Let’s start with the Win32_TPM WMI class.
If you retrieve a list of WMI objects using the -List parameter Win32_TPM WMI class doesn’t show up, and if you try Get-WmiObject Win32_TPM it will give you an error stating the class is invalid. This is because you have to specify the Namespace or path where the class exists:
Get-WmiObject -Namespace root/cimv2/security/microsofttpm -Class Win32_TPM
This is definitely more involved than simply providing the class name, but it does the job. Note: To use the Win32_TPM class, you need administrative credentials.
WMI is not just a read-only system; there are methods—programmatic functions—that can be executed against WMI objects. This has limited benefit in terms of hardware but is more useful with things like system processes or services.
There are a couple of methods with Win32_TPM class that are particularly useful to know about, but first here’s how to pull a list of methods that are available to the class:
$tpm = Get-WmiObject -Namespace root/cimv2/security/microsofttpm -Class Win32_TPM
$tpm | Get-Member -MemberType Method
Get-Member is one of those cmdlets along with Get-Help that can come in handy almost daily. This pair of commands first stores the output from the WMI class to the $tpm variable, and then lists the methods associated with that class. A few potentially useful methods within the Win32_TPM class are IsActivated( ), IsEnabled( ), and SelfTest( ); each of which can be executed by referencing the variable followed by the method like: $tpm.SelfTest( ).
As mentioned earlier, there is a set of dedicated TPM cmdlets, and you can get the list using Get-Command -Noun Tpm, and here is something to note about one of them. If you execute Get-Tpm you’ll probably notice right away that there’s quite a bit of overlap from the WMI-based details we’ve been working through. Obviously Get-Tpm is a lot quicker to type out than the full WMI command, but the major downside is that there’s no -ComputerName parameter as there is with Get-WmiObject, so executing against remote systems is more of a challenge.
Check warranty status
Depending on the manufacturer of your server hardware it may be possible to check its warrantee status programmatically, assuming your hardware vendor supports it. If you use one of the big vendors like HPE, Dell, or Lenovo, chances are good that there is an API available, and even a PowerShell package available in the PowerShell Gallery. In most cases you’ll need to be able to pass the module your system’s serial number (a.k.a. service tag), which you can get using the SerialNumber property in the Win32_Bios class:
Get-WmiObject Win32_Bios | Select-Object -ExpandProperty Serialnumber
Copyright © 2021 IDG Communications, Inc.

