- I recommend the Pixel 9 to most people looking to upgrade - especially while it's $250 off
- Google's viral research assistant just got its own app - here's how it can help you
- Sony will give you a free 55-inch 4K TV right now - but this is the last day to qualify
- I've used virtually every Linux distro, but this one has a fresh perspective
- The 7 gadgets I never travel without (and why they make such a big difference)
ANALYSIS: Intelligent Next Generation Security Operations Platform – Stellar Cyber – Cyber Defense Magazine

I’ll begin by making a bold statement: Stellar Cyber is a beast. For you who may be thinking, “he’s about to demolish this product”, I’m sorry to disappoint you.
Today’s enterprises are beasts. Combinations of centralized, distributed private cloud and public cloud networks, and the cybercriminals who attack them are even bigger beasts and it takes one to manage one. I have looked at a lot of similar products over the years and even have used a few and I can say unequivocally that if I had to manage security on a big network, I would dig in my heals until management funded acquisition of this product. As a digital investigation specialist and cyber forensic scientist, I could not ask for a more complete security management platform. Everything I need is there. That said, let us dig into riding this beast into a bushel of potential challenges that security analysts face every day.
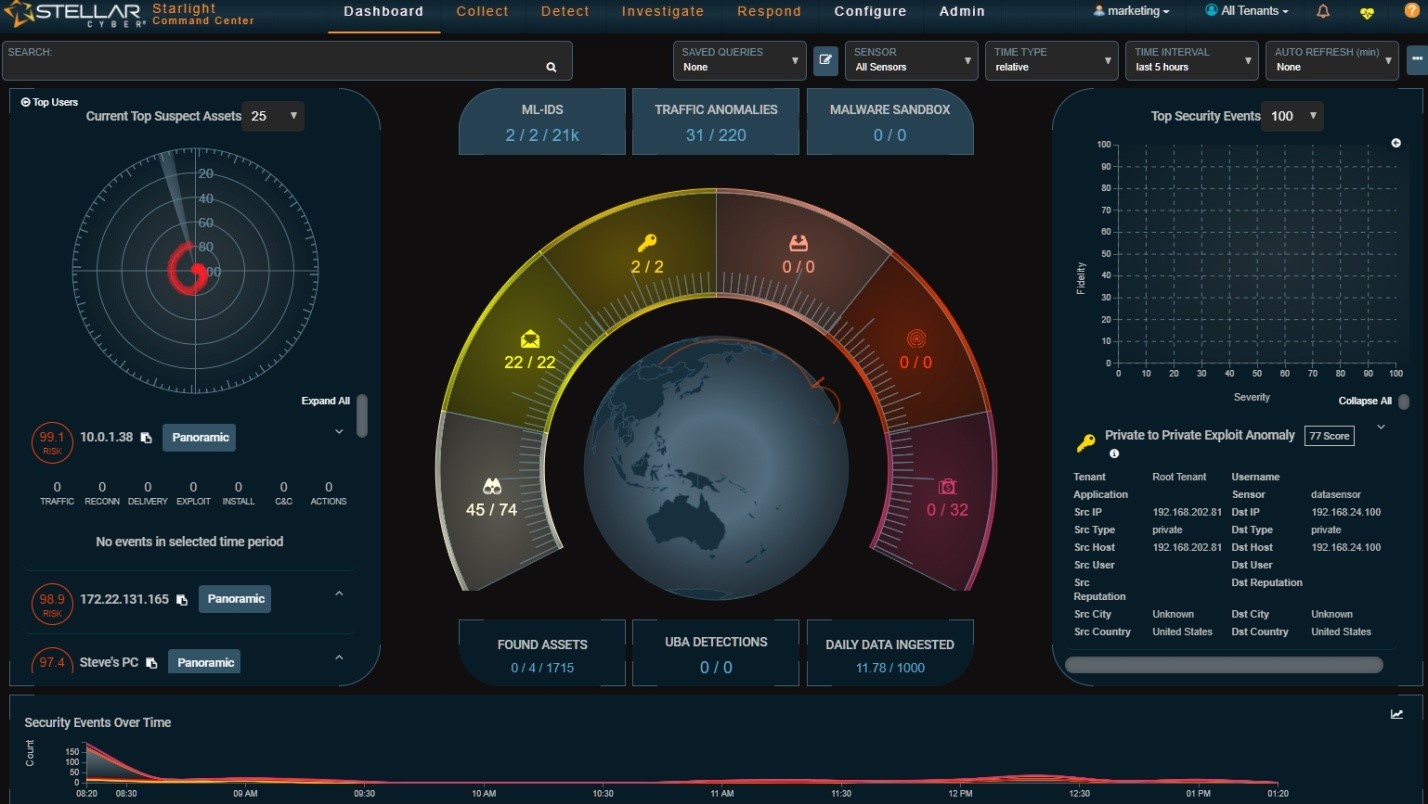
Everything starts with the Command Center (see Figure 1). This is an important statement because the Command Center gives a pretty detailed view of what is happening on your enterprise. I never have seen a better UI and about 95% are lots worse.
Figure 1 – Stellar Cyber Command Center
It’s also a bit of an unusual way to begin an analysis. So, let’s back up a bit and figure out just what this Command Center really is telling us. First, the main dashboard is beautifully laid out. The centerpiece is a spinning globe showing geographic activity around the world. It is surrounded by a display of events based upon the cyber kill chain. Clicking on any of the kill chain steps accesses a second level menu with lots of submenus for additional details. (see Figure 2).
I have seen a few very dramatic and futuristic dashboard landing pages, but none that have the combination of futuristic presentation and real utility that this one has. Moreover, this one does not suffer from what I call the “New York City hotel syndrome”. That is when the lobby is dripping with gold, crystal, and marble but the rooms are small and barely livable. This tool’s rooms are every bit as full of usefulness as the landing dashboard.
This system truly is an enterprise security engineer’s complete toolbox. And it’s laid out so nicely that you can get to exactly what you need with almost no difficulty because it’s intuitive.
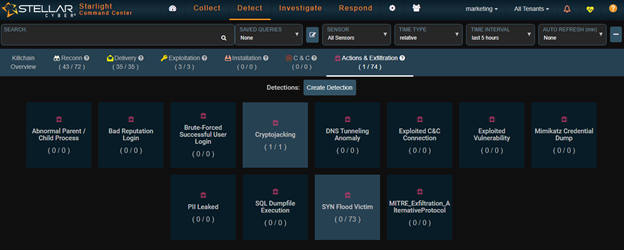
Figure 2 – Drill-Down From Exfiltration Element of the Kill Chain
The landing page – dashboard – has four major drop-downs: Collect, Detect, Investigate and Respond. When you select one of the steps for the kill chain for drill-down you are taken to the correct drop-down. In the case of the example above we were taken to Detect. Examining the resulting menu, we see that there have been 63 syn flood attempts – none successful – and 1 cryptojackng attempt that was successful. Let’s get a closer look at that one.
At the top of the page the tool gives us a definition of our event, in this case cryptojacking:
The unauthorized use of a computer to mine cryptocurrency.
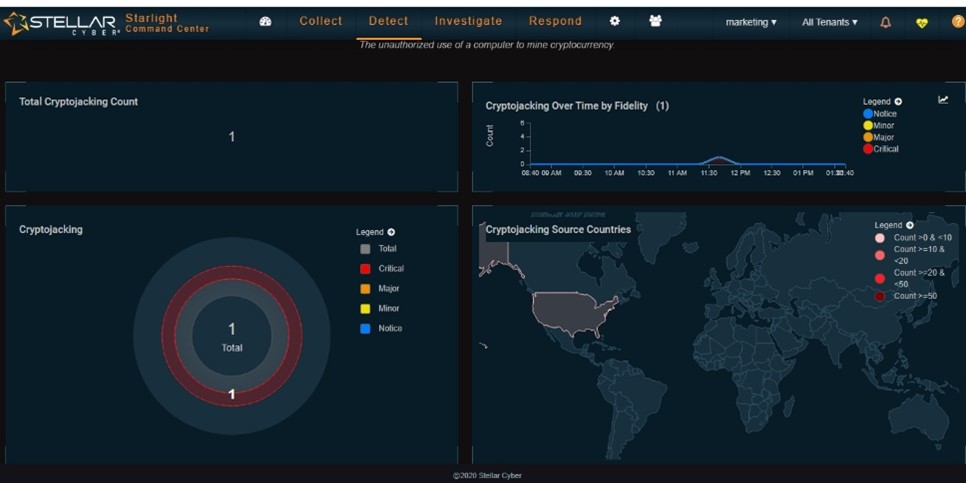
Now we need some more detail. Figure 3 shows the graphical display for this event.
Figure 3 – Graphical Display for the Cryptojacking Event
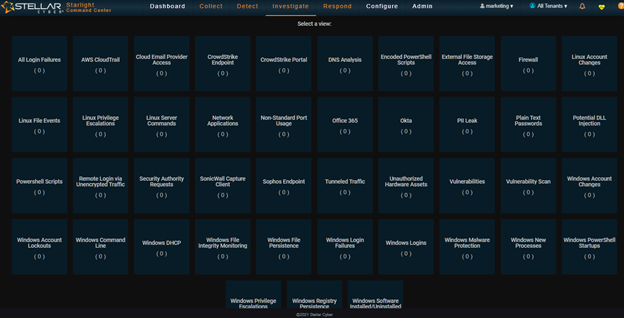
This gives us a very good general picture of the event but we can do more. This is the Detect menu. We have two more dropdowns: Investigate and Respond. Investigate has some additional dropdowns and my favorite is Threat Hunting. One of the Threat Hunting dropdowns opens a large collection of threat hunting tools in what is called its Threat Hunting Library (see Figure 4).
Figure 4 – Threat Hunting Library
Selecting a menu in the Library simply is a matter of seeing a menu that shows activity and clicking on it (there are none in this view). That opens a second menu that has all of the information needed to address the problem. You can address the problem from the Response dropdown and there you will find a large collection of responses from clearing the problem to notification. In short – I have kept this very short so that we have time to dig into configuration and deployment – if you need it to trace an issue – even one that is complicated to describe – you have a tool built into the Stellar Cyber platform that facilitates your successful resolution.
Deploying the Beast
This is not difficult to deploy but there are a few small “gotchas”. First, we need a data processor. This piece is where data is analyzed, where the data lake lives and where the sensors report. It can be a virtual machine in your enterprise or in the AWS cloud. I installed it on one of my VMWare hosts. There I hit my first snag. This is a good time to point out that support at Stellar Cyber is superb. They are knowledgeable and responsive My host is an older version of VMWare and it is not supported by the OVF that you download from Stellar. No problem. I just unpacked the OVF using zip and edited the VirtualSystemType:
cloudimg-20201106</vssd:VirtualSystemIdentifier>
<vssd:VirtualSystemType>vmx-10</vssd:VirtualSystemType>
I changed the vmx-10 to match my version of VMWare. Now, you’ll find that the hash of the OVF doesn’t match the manifest. So you need to take the .mf file and run a program that will give you a new hash. I used sha1sum.exe, ran it against my updated OVF file and replaced the hash in the manifest file with the new one.
063f1c42dfe7a0139ccf06017971fa3170110117 ubuntu-xenial-16.04-cloudimg.ovf
That’s it. The OVF ran perfectly and I had a new VM for my aella-dataprocessor (DP).
Now, we need to set up the VM with an IP address that our sensors can reach. Since I was testing this in the lab, that’s where I set up the DP. I gave it an internal IP address that all of my inside machines – physical and virtual – could reach. Now we need to install sensors on the machines we want to monitor. That is a walk in the park. I picked the Agent Sensor for Windows, uploaded it to all of the Windows machines that I wanted to monitor and ran it. The install is nearly automatic. At the end it asks a couple of questions – such as the IP of the DP – and you’re done.
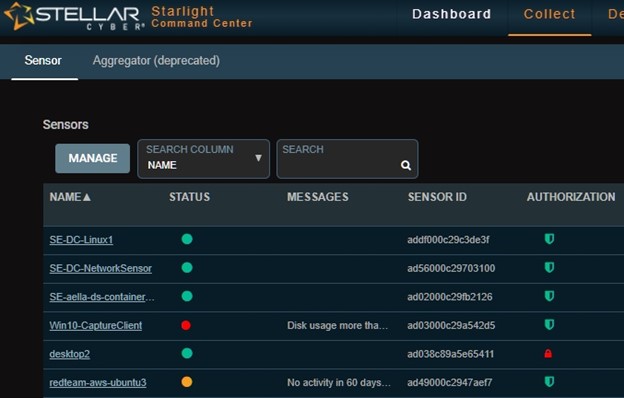
The sensor starts communicating with the DP and you’ll see it in the Collect/Sensor Overview menu. You’ll note that the sensor in the authorization column either is green or red. If it is red, you’ll need to authorize it – another walk in the park. See Figure 5.
Figure 5 – Sensor Overview Dropdown Showing Authorization
Once your sensors are communicating and authorized you’ll start collecting data. Note that you only collect data when there is something to collect. The sensor reads the logs and if it sees something it reacts. If not, it just keeps on watching. However, it is collecting and there are lots of menus that contain useful information, many of which are under the Investigate dropdown.
There are other sensors that we can deploy such as network and deception. Remember that this is a machine learning enabled system so it is constantly gathering new data and learning from it. When we deploy a sensor outside of our firewall, and the DP is inside, we need to do a bit of firewall configuration in the form of port forwarding.
In short, this may be a beast, but taming it is very straightforward. Its “beastliness” comes from the massive number of tools that are not just built in, but tightly integrated. In short this is a one stop shop for an enterprise security engineer. If it’s not here, as an analyst you probably don’t need it. And on that topic, there are multiple dashboard views, each with a different emphasis – Home, Company Trends, Operational View and Analyst View. The Analyst View, for example, is a verbose overview of activity and makes a good starting point for tracking down a problem.
Opinion
As you might expect, I liked this one a lot. I liked it so much that I may deploy it in my lab for future research and analysis. However, my lab is small. You really get an idea of its power on a bigger enterprise. But don’t think that this is of little use if your enterprise is medium rather than gigantic. The bad guys use small and medium enterprises as pivot points to get to other places undetected because thay believe that the smaller enterprises are not well-protected. Surprise! With Stellar Cyber they are in for a shock. They may think that they are beasts, but this system is “beastier”.
Stellar Cyber is highly recommended.
P. R. Stephenson, PhD, CISSP (ret)
Publisher of Future inTense
Exclusively at Cyber Defense Magazine

