- I've yet to find a retro stereo amp that delivers sound as accurately for various genres than this
- Use AI at work? You might be ruining your reputation, a new study finds
- Why Whoop's policy change has fans fuming
- Apple now sells refurbished iPhone 15 models at discounted prices (including the Pro Max)
- The best no-log VPNs of 2025: Expert tested and reviewed
Cisco Jabber Directory options
Original Link # http://www.ccierants.com
It’s been a while since I posted my Cisco Jabber huge improvements blog! I even promised you I would explain the new directory options available in jabber!
Moving country etc got in the way and their has been a delay but better late than never right? I am also finding more and more customers are asking for jabber, It’s no longer the joke compared to Microsoft Lync that it used to be. With collaboration edge and other improvements, it’s a great program.
OK, on to directory options.
Cisco Jabber has three directory options:
Enhanced Directory Integration (EDI)
- Windows devices only
- Easiest to setup/No real setup required
- The way I often hear this described is that it uses the outlook address book, this isn’t actually what happens, the way EDI works is that the client uses DNS to find the local AD global catalog and binds to this using the login credentials of the user. A lot of Windows Applications use this Windows Directory API in a similar fashion.
- Other than making sure the client is a Windows PC and is actually on the domain, and that the user who is logging in is part of the domain, you should not have to perform much configuration here.
- This of course assumes your Windows Domain has been setup correctly, but you as the network engineer should not have to do anything to get this going.
- When you go to “Show connection status” in your jabber client, you will not see any mention of trying to connect to the EDI directory, it will not show up in your jabber client as connected/not connected as it’s all part of the Windows API. So keep this in mind!
Basic Directory Integration (BDI)
- This is the “Traditional” method of LDAP integration with jabber where by you must specify the LDAP server and directory information as part of the service profile for that user.
- You can create a user who is able to bind to LDAP for this OR you can support an anonymous bind. You can provide this information via the service profile (which is downloaded by the client) or the client configuration file.
Universal Directory Service (UDS)
- UDS will use the users that are part of the CUCM end user webpage as the directory entries
- This is designed for when users are outside your network, on the collab-edge
- It prevents you from having to expose your LDAP server to the internet for jabber for iphone etc.
- you CAN force both internal and external clients to use UDS if for example, your an all-mac shop who do not use LDAP, or your cluster covers multiple AD domains, or any other reason you can think where you would rather use the CUCM database than the AD database to retrieve contacts.
- You MUST have DNS setup properly for this to work, _cisco-uds must exist and must point to the hostname of the CUCM, the actual hostname of the CUCM (for example, perpub.cucm.com) must be fully resolvable, best bet is to point the _cisco-uds.cucm.com to perpub.cucm.com, which in turn will point to the IP address of your CUCM server.
- Your jabber client WILL cache these entries, separately from your operating system cache of these entries meaning if at first you forget to setup the _cisco-uds record and then add it later. it still may not work. if you suspect this is the issue your having, be sure to completely uninstall the application from your device and clear out any appropriate folders such as the Application Data folder in Windows for your jabber application.
Check out what the deployment guide has to say about the DNS entries:
Make sure all the above is correct! UDS simply won’t work without all the above being true.
Let’s see how to configure each of them shall we?
Login to CUCM and navigate to User Management -> User Settings -> Service profile
You will see something like the below:
As you can see, a directory server hasn’t been selected and most of the config is missing, this is perfectly fine if your using EDI, the “Use UDS for Contact Resolution” means that external users who don’t have access to the Windows Directory API since they are outside your firewall will automatically use UDS when connecting externally.
The features labelled “Only used for Advance Directory” can be used to set filters for the Windows Directory API. This allows you to narrow down the results returned by the Windows Directory Api to just users enabled for Jabber. You could safely leave this alone if you preferred however.
So for those of you planning to use a combination of EDI and UDS, your job is complete, so long as your windows domain is setup correctly, for those planning to use BDI, read on!
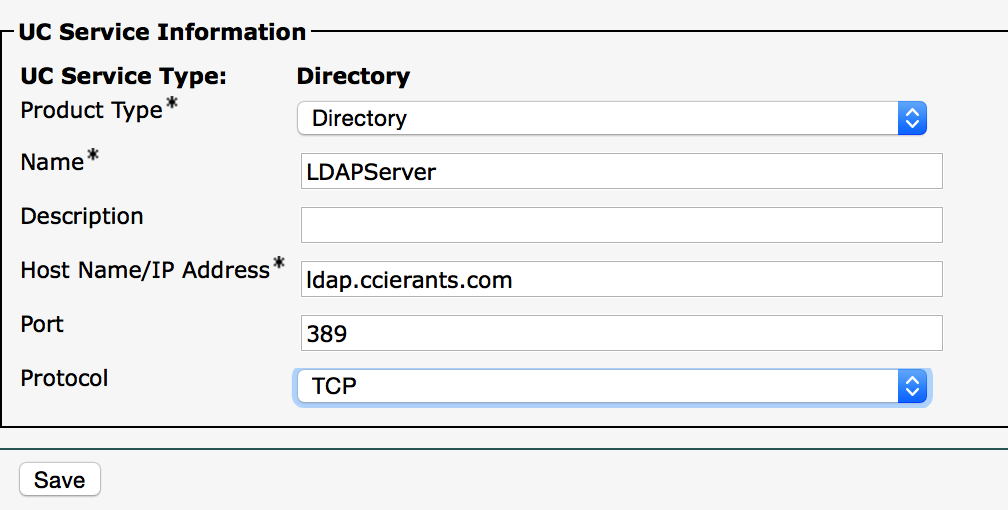
For BDI, you will need to define the LDAP Directory servers, this can be done under User Management -> User Settings -> UC Service.
Create a directory profile and add in the appropriate details:
An important note about the protocol, according to the deployment guide, you need to use a particular protocol for each type of device:
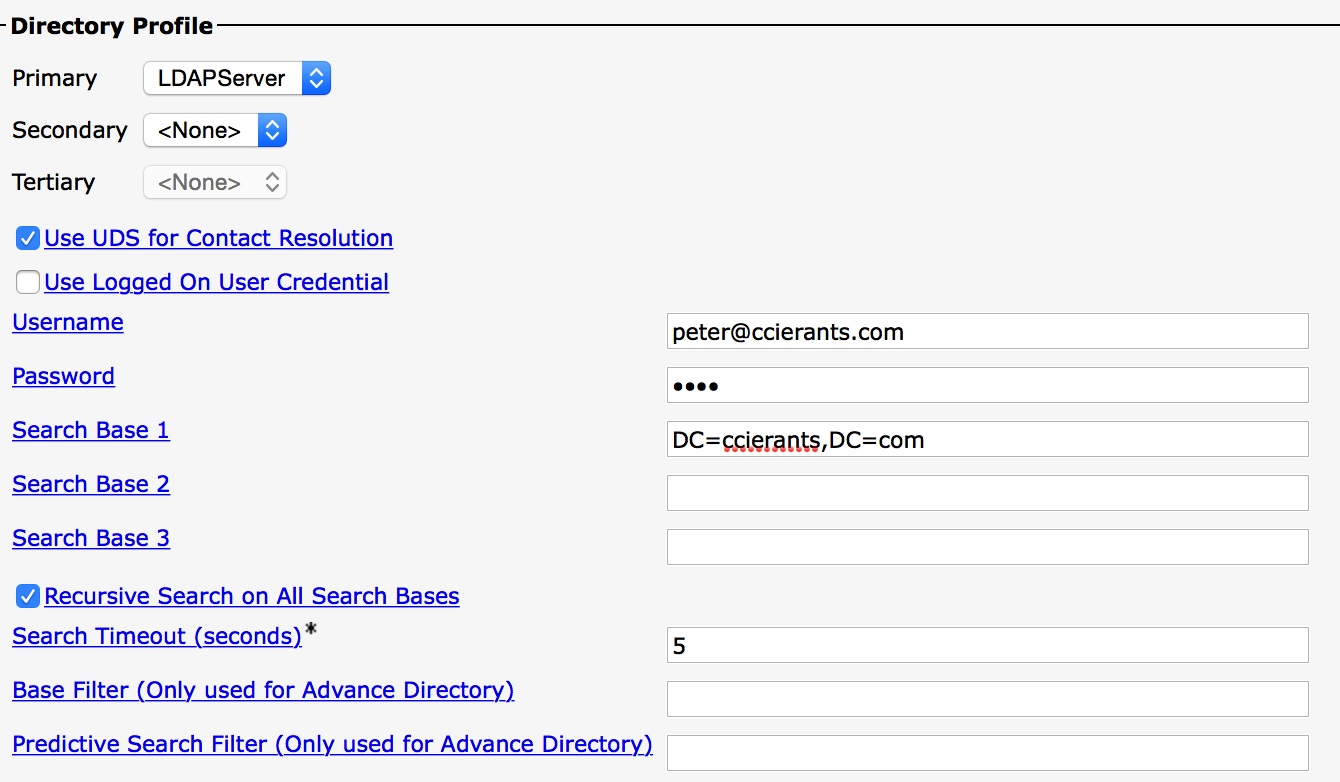
Once this is done, go back to your service profile and select the LDAP directory server you just created.
As you can see, in my example above I have created a separate user and assigned that user to be able to read the LDAP directory (must be able to bind to it), the format must be the username@domain format. You can also use the users logged in credentials if you prefer, the search bases (which unfortunately their are only 3 of) should be in the standard LDAP format.
My advice if your having trouble getting this going is to use jxplorer (http://jxplorer.org/
Finally, for some people it may make sense to do away with LDAP completely and strictly use the CUCM directory for contacts. This is done by strictly using UDS. The method to do this requires you make a modification to the client configuration file to force the use of UDS.
(Important note: Whatever you place into the client configuration settings will be overwritten if their UC service profile has a directory listed, so keep that in mind!)
The modifications you will need to make to the jabber-config.xml file are shown below:
UDS
11.22.33.444
http://server-name/%%uid%%.
However, you might find using the config generator a heck of a lot easier:
https://supportforums.cisco.
You can generate a nice config from this, simply unzip the html files and run them in a local web browser, then upload the file to your tftp servers, don’t forget to upload it for ALL your tftp servers that your jabber client might use.
All of the material for the above blogpost was obtained through a bit of trial and error as well as reading a lot of material from the Jabber Deployment Guide for Version 10.5
I cannot stress enough how good this deployment guide is, it has all the information you could ever need. It is quite long but goes down to what version of office you need, failover and just about any other jabber setting you can think of.


