- 4 PC parts I'm buying to upgrade my computer (and the 7 I'm keeping)
- 8 steps to ensure data privacy compliance across borders
- My 6 favorite open-source Android apps from the Google Play store - and why that matters
- The best anti-Prime Day deals 2025 from Best Buy, Walmart, & more: Top sales from Amazon's competition
- I've tested dozens of wearables and the Apple Watch 10 is one of my favorites - here's why
CUE Licenses
Note: Useful LINK COPIED FROM OTHER SOURCE FOR REFERENCE
INTRODUCTION
Unity Express provides any organization with a quick and convenient way to manage voicemail, auto attendant and interactive voice response (IVR) services. These services are provided within the Unity Express module.
When purchased, Unity Express includes a few licenses for some services, such as voice ports for auto attendant, while other services like mailboxes are not included. This policy forces companies requiring these services to purchase additional licenses from Cisco in order to activate or expand the system’s capacity.
A good example is the Unity Express voice mailbox service. When purchasing Unity Express, by default it does not include any mailboxes.
While the Unity Express web interface allows the creation of voice mailboxes despite the fact no licenses are installed, you won’t be able to make use of them unless the appropriate number of licenses is installed.
When a caller is redirected to a user’s voice mailbox where the system does not have the necessary licenses installed, instead of hearing the called party’s voicemail prompting to leave a message, the following prompt is heard:
Voice mail system is unavailable, try again later, to talk to the operator, press zero.
Engineers and Administrators interested can read our popular articles covering the physical installation and initial setup of Unity Express on Cisco CallManager Express or Cisco Voice Gateways:
INSTALLING & VERIFYING UNITY EXPRESS LICENSES – 4 SIMPLE STEPS
Installing Unity Express licenses is not all that complicated. We’ve broken down the process into four simple steps to make it as clear and simple as possible:
-
Registering and Assigning your Product Authorization Key (PAK) number
-
Obtaining the Correct UDI Product ID and Serial Number
-
Installing the Software License on Unity Express
-
Verifying Unity Express License Installation
No matter what type of license you have the installation process is the same. It is important to note that when installing multiple PAKs for a service they must be combined into a single license. For example, if you have purchased four packs of 5-user-mailbox licenses to support a total of 20 users, you must ensure these are combined into a single 20 mailbox license file and not four x 5-mailbox license files. If problems arise, Cisco support is always available to help resolve any licensing problem.
Before we begin the license installation process it is important to verify the existing licenses so we are sure of what we have already.
VERIFYING EXISTING CISCO UNITY EXPRESS LICENSES
Before considering purchasing licenses it is necessary to verify what is already installed. This is easily done by using the following command to view the currently installed licenses. Note that the License Type: Permanent from the command output is what we are looking for. This represents a permanent license, which is also the installed licenses:
Note: We’ve removed the rest of the command output to avoid redundant information.
License Type: Evaluation is, as the output indicates, evaluation licenses. These are not installed/purchased licenses and normally are limited to a 60 day trial period after which they expire and are disabled.
Another way to verify the installed licenses is to log into the Unity Express GUI interface and visit the Administration>Licenses section:
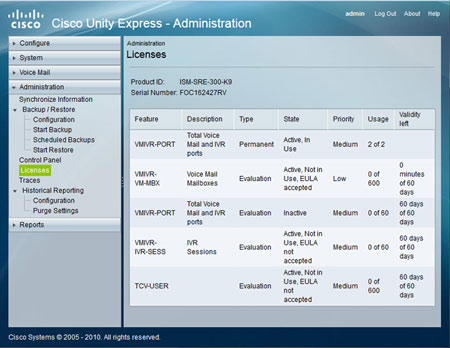
As both CLI output and GUI interface confirm, we currently have two VMIVR-PORT licenses installed. This license feature will allow up to two simultaneous calls to the autoattendant system or user voice mailbox service.
REGISTER & ASSIGN YOUR CISCO PRODUCT AUTHORIZATION KEY (PAK) NUMBER
When purchasing a Unity Express license, you’ll receive it either as a hardcopy or electronically delivered license. The license contains an 11-digit Product Authorization Key number, also known as PAK. The PAK is basically your license, which needs to be associated with your Unity Express hardware. This process is done through the Cisco.com website. Once associated, the necessary license file will be delivered to you electronically and you’ll then need to install it on Unity Express.
To begin registration, visit http://www.cisco.com/go/license. A valid CCO account is required, so users without a CCO account will be required to register first. After the logon process is complete, we need to enter our 11-digit PAK number as shown in the screenshot below:
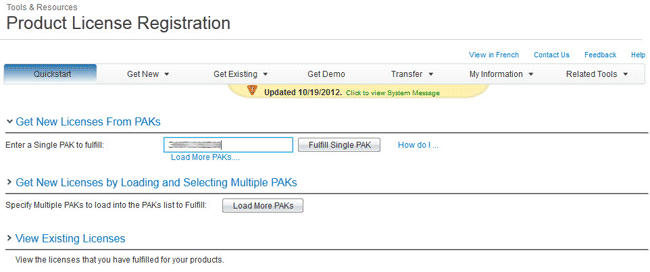
If more than one license PAK has been purchased for the same family product, for example 2 packs of 5-user mailbox license, then click on the Load More PAKs button and the page will provide additional fields to enter all purchased PAKs.
Since our example only contains a single PAK, we enter it and then click on Fulfil Single PAK.
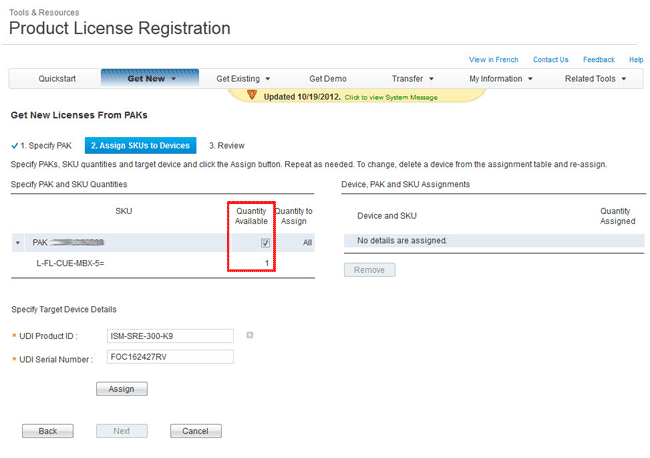
The next page allows us to assign our PAK to our Unity Express hardware. Click the Quantity Available check-box to ensure all quantities are selected (one in our case) and below enter the UDI Product ID and Serial Number.
Note: The small arrow box on the right of the UDI Product ID field (shown in the screenshot below) will produce a pop-up window instructing to issue the “Show License UDI” CLI command in Unity Express, to obtain the correct Product ID and Serial Number, however, the information provided by the CLI prompt is misleading and can cause confusion.
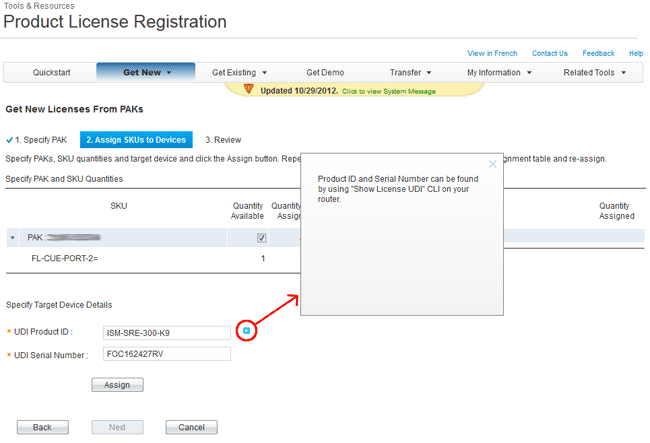
The next section covers how to obtain the correct UDI Product ID and Serial Number.
OBTAINING THE CORRECT UDI PRODUCT ID AND SERIAL NUMBER
From your router prompt, connect to the Unity Express CLI prompt and issue the show license udi command:
Note that, under the UDI column, the system shows ISM-SRE-300-K9:FOC162427RV – this is actually the UDI and serial number (UDI:SERIAL_Number). The UDI is everything before the semicolon (:).
So, UDI is ISM-SRE-300-K9 and the system serial number is FOC162427RV. If ISM-SRE-300-K9:FOC162427RV is entered in the UDI Product ID field, the system will not accept it.
Cisco does not mention how to distinguish the correct UDI from the output provided, this can cause frustration when trying to assign the PAK to the hardware.
Even the show version provides the same confusing result. Notice the UDI section:
REGISTER & ASSIGN YOUR PRODUCT AUTHORIZATION KEY (PAK) NUMBER (CONTINUED)
After entering the UDI Product ID and Serial Number in the provided fields, press the Assign button to assign the PAK to the Unity Express hardware. The page will update and show Device, PAK and SKU assignment:
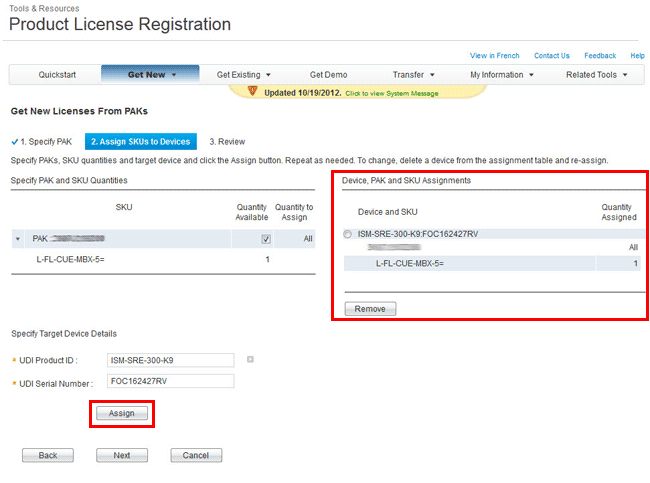
We are now ready to continue by clicking on the Next button.
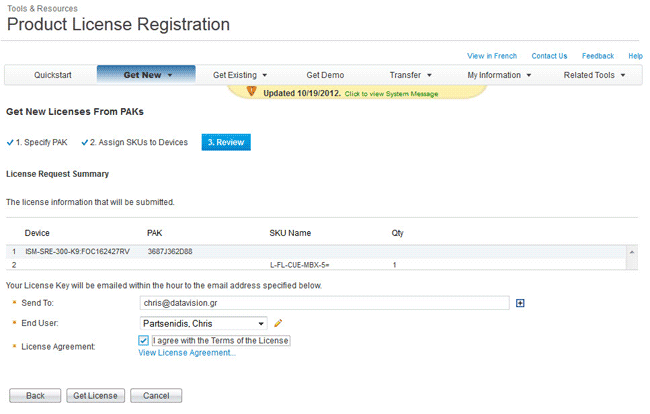
The system now presents us with the final page where we enter our email address and confirm the end user. We must agree to the License terms before the license can be generated. When ready, click on the Get License button:
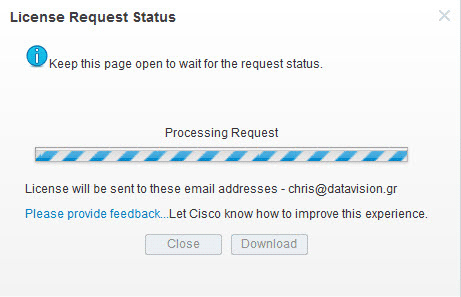
A pop up window confirms the license is being processed and will be emailed when complete. This takes a couple of seconds. There is also an option to download the license directly in case access to email is not possible:
A final confirmation window tells us the license is ready for download and has also been emailed to our registered address:
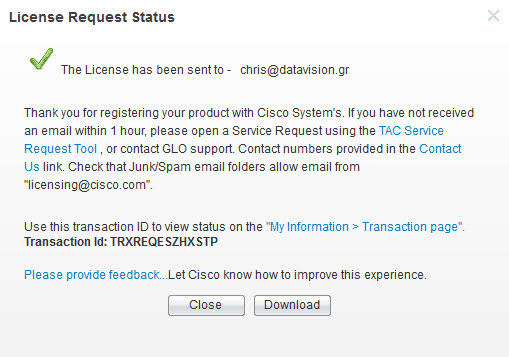
The license file name is somewhat long and contains the system’s serial number and a 17 digit number.
INSTALLING THE SOFTWARE LICENSE ON UNITY EXPRESS
Unity Express licenses are installed via an FTP server. The FTP server will serve the license file and we’ll instruct Unity Express to fetch the license using the CLI prompt.
We assume an FTP server is up and running on a workstation and is accessible from Unity Express.
Now we need to log into Unity Express and issue the command so it can fetch the license and install it.
Note the command syntax is ftp://username:password@ftp_server_ip/licensefilename:
VERIFY UNITY EXPRESS LICENSE INSTALLATION
Upon reboot, Unity Express will enable the newly installed license and it will be available for use. When the reboot completes, we can verify the license status using the show license status application command.
To make things a bit more interesting we created 10 voice mailboxes while installing a 5 user mailbox license. This means we had more mailboxes than our installed license allowed. Check out the result:
When dialing a user’s extension where voicemail was enabled, as explained earlier, instead of the standard greeting message we got the Cisco lady telling us : Voice mail system is unavailable, try again later, to talk to the operator, press zero.
After deleting the 5 additional mailboxes and issuing the show license status application command, we notice the voicemail service is now enabled:
USEFUL UNITY EXPRESS LICENSE SHOW COMMANDS
Following is a collection of useful commands that provide information on Unity Express’s license condition:
The show license status application command displays the status of the license applications installed in Unity Express. The command accepts additional parameters such as: ivr, ports, timecardview, voicemail. By entering the command as shown, it will display information for all applications:
The show license all command displays the summary of all the licenses installed in your Unity Express system. The command has no additional parameters:
The show license in-use command displays information about the licenses that are in use on your Unity Express module. Again, there are no additional parameters for this command:
License Priority: Medium

