- Learn with Cisco at Cisco Live 2025 in San Diego
- This Eufy robot vacuum has a built-in handheld vac - and just hit its lowest price
- I highly recommend this Lenovo laptop, and it's nearly 50% off
- Disney+ and Hulu now offer prizes, freebies, and other perks to keep you subscribed
- This new YouTube Shorts feature lets you circle to search videos more easily
Develop Kubernetes Operators in Java without Breaking a Sweat | Docker

Developing Kubernetes operators in Java is not yet the norm. So far, Go has been the language of choice here, not least because of its excellent support for writing corresponding tests.
One challenge in developing Java-based projects has been the lack of easy automated integration testing that interacts with a Kubernetes API server. However, thanks to the open source library Kindcontainer, based on the widely used Testcontainers integration test library, this gap can be bridged, enabling easier development of Java-based Kubernetes projects.
In this article, we’ll show how to use Testcontainers to test custom Kubernetes controllers and operators implemented in Java.

Kubernetes in Docker
Testcontainers allows starting arbitrary infrastructure components and processes running in Docker containers from tests running within a Java virtual machine (JVM). The framework takes care of binding the lifecycle and cleanup of Docker containers to the test execution. Even if the JVM is terminated abruptly during debugging, for example, it ensures that the started Docker containers are also stopped and removed. In addition to a generic class for any Docker image, Testcontainers offers specialized implementations in the form of subclasses — for components with sophisticated configuration options, for example.
These specialized implementations can also be provided by third-party libraries. The open source project Kindcontainer is one such third-party library that provides specialized implementations for various Kubernetes containers based on Testcontainers:
ApiServerContainerK3sContainerKindContainer
Although ApiServerContainer focuses on providing only a small part of the Kubernetes control plane, namely the Kubernetes API server, K3sContainer and KindContainer launch complete single-node Kubernetes clusters in Docker containers.
This allows for a trade-off depending on the requirements of the respective tests: If only interaction with the API server is necessary for testing, then the significantly faster-starting ApiServerContainer is usually sufficient. However, if testing complex interactions with other components of the Kubernetes control plane or even other operators is in the scope, then the two “larger” implementations provide the necessary tools for that — albeit at the expense of startup time. For perspective, depending on the hardware configuration, startup times can reach a minute or more.
A first example
To illustrate how straightforward testing against a Kubernetes container can be, let’s look at an example using JUnit 5:
@Testcontainers
public class SomeApiServerTest {
  @Container
  public ApiServerContainer> K8S = new ApiServerContainer<>();

  @Test
  public void verify_no_node_is_present() {
    Config kubeconfig = Config.fromKubeconfig(K8S.getKubeconfig());
    try (KubernetesClient client = new KubernetesClientBuilder().withConfig(kubeconfig).build()) {
      // Verify that ApiServerContainer has no nodes
      assertTrue(client.nodes().list().getItems().isEmpty());
    }
  }
}
Thanks to the @Testcontainers JUnit 5 extension, lifecycle management of the ApiServerContainer is easily handled by marking the container that should be managed with the @Container annotation. Once the container is started, a YAML document containing the necessary details to establish a connection with the API server can be retrieved via the getKubeconfig() method.
This YAML document represents the standard way of presenting connection information in the Kubernetes world. The fabric8 Kubernetes client used in the example can be configured using Config.fromKubeconfig(). Any other Kubernetes client library will offer similar interfaces. Kindcontainer does not impose any specific requirements in this regard.
All three container implementations rely on a common API. Therefore, if it becomes clear at a later stage of development that one of the heavier implementations is necessary for a test, you can simply switch to it without any further code changes — the already implemented test code can remain unchanged.
Customizing your Testcontainers
In many situations, after the Kubernetes container has started, a lot of preparatory work needs to be done before the actual test case can begin. For an operator, for example, the API server must first be made aware of a Custom Resource Definition (CRD), or another controller must be installed via a Helm chart. What may sound complicated at first is made simple by Kindcontainer along with intuitively usable Fluent APIs for the command-line tools kubectl and helm.
The following listing shows how a CRD is first applied from the test’s classpath using kubectl, followed by the installation of a Helm chart:
@Testcontainers
public class FluentApiTest {
  @Container
  public static final K3sContainer> K3S = new K3sContainer<>()
    .withKubectl(kubectl -> {
      kubectl.apply.fileFromClasspath(“manifests/mycrd.yaml”).run();
    })
    .withHelm3(helm -> {
      helm.repo.add.run(“repo”, “https://repo.example.com”);
      helm.repo.update.run();
      helm.install.run(“release”, “repo/chart”);
    );
  // Tests go here
}
Kindcontainer ensures that all commands are executed before the first test starts. If there are dependencies between the commands, they can be easily resolved; Kindcontainer guarantees that they are executed in the order they are specified.
The Fluent API is translated into calls to the respective command-line tools. These are executed in separate containers, which are automatically started with the necessary connection details and connected to the Kubernetes container via the Docker internal network. This approach avoids dependencies on the Kubernetes image and version conflicts regarding the available tooling within it.
Selecting your Kubernetes version
If nothing else is specified by the developer, Kindcontainer starts the latest supported Kubernetes version by default. However, this approach is generally discouraged, so the best practice would require you to explicitly specify one of the supported versions when creating the container, as shown:
@Testcontainers
public class SpecificVersionTest {
  @Container
  KindContainer> container=new KindContainer<>(KindContainerVersion.VERSION_1_24_1);
  // Tests go here
}
Each of the three container implementations has its own Enum, through which one of the supported Kubernetes versions can be selected. The test suite of the Kindcontainer project itself ensures — with the help of an elaborate matrix-based integration test setup — that the full feature set can be easily utilized for each of these versions. This elaborate testing process is necessary because the Kubernetes ecosystem evolves rapidly, and different initialization steps need to be performed depending on the Kubernetes version.
Generally, the project places great emphasis on supporting all currently maintained Kubernetes major versions, which are released every 4 months. Older Kubernetes versions are marked as @Deprecated and eventually removed when supporting them in Kindcontainer becomes too burdensome. However, this should only happen at a time when using the respective Kubernetes version is no longer recommended.
Bring your own Docker registry
Accessing Docker images from public sources is often not straightforward, especially in corporate environments that rely on an internal Docker registry with manual or automated auditing. Kindcontainer allows developers to specify their own coordinates for the Docker images used for this purpose. However, because Kindcontainer still needs to know which Kubernetes version is being used due to potentially different initialization steps, these custom coordinates are appended to the respective Enum value:
@Testcontainers
public class CustomKubernetesImageTest {
  @Container
  KindContainer> container=new KindContainer<>(KindContainerVersion.VERSION_1_24_1.withImage(
“my-registry/kind:1.24.1”));
  // Tests go here
}
In addition to the Kubernetes images themselves, Kindcontainer also uses several other Docker images. As already explained, command-line tools such as kubectl and helm are executed in their own containers. Appropriately, the Docker images required for these tools are configurable as well. Fortunately, no version-dependent code paths are needed for their execution.
Therefore, the configuration shown in the following is simpler than in the case of the Kubernetes image:
@Testcontainers
public class CustomFluentApiImageTest {
  @Container
  KindContainer> container=new KindContainer<>()
.withKubectlImage(DockerImageName.parse(“my-registry/kubectl:1.21.9-debian-10-r10”))
.withHelm3Image(DockerImageName.parse(“my-registry/helm:3.7.2”));
  // Tests go here
}
The coordinates of the images for all other containers started can also be easily chosen manually. However, it is always the developer’s responsibility to ensure the use of the same or at least compatible images. For this purpose, a complete list of the Docker images used and their versions can be found in the documentation of Kindcontainer on GitHub.
Admission controller webhooks
For the test scenarios shown so far, the communication direction is clear: A Kubernetes client running in the JVM accesses the locally or remotely running Kubernetes container over the network to communicate with the API server running inside it. Docker makes this standard case incredibly straightforward: A port is opened on the Docker container for the API server, making it accessible.
Kindcontainer automatically performs the necessary configuration steps for this process and provides suitable connection information as Kubeconfig for the respective network configuration.
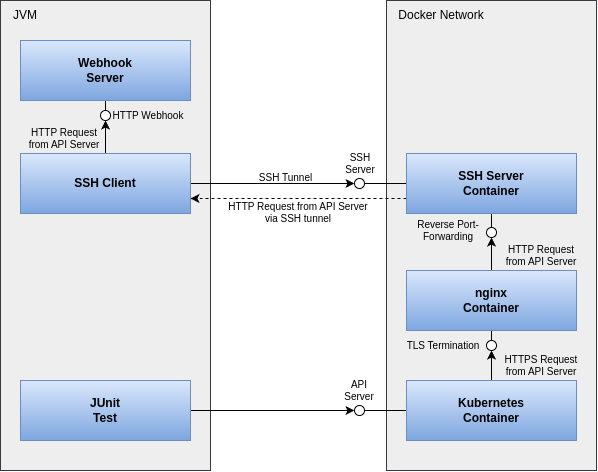
However, admission controller webhooks present a technically more challenging testing scenario. For these, the API server must be able to communicate with external webhooks via HTTPS when processing manifests. In our case, these webhooks typically run in the JVM where the test logic is executed. However, they may not be easily accessible from the Docker container.
To facilitate testing of these webhooks independently of the network setup, yet still make it simple, Kindcontainer employs a trick. In addition to the Kubernetes container itself, two more containers are started. An SSH server provides the ability to establish a tunnel from the test JVM into the Kubernetes container and set up reverse port forwarding, allowing the API server to communicate back to the JVM.
Because Kubernetes requires TLS-secured communication with webhooks, an Nginx container is also started to handle TLS termination for the webhooks. Kindcontainer manages the administration of the required certificate material for this.
The entire setup of processes, containers, and their network communication is illustrated in Figure 1.


Fortunately, Kindcontainer hides this complexity behind an easy-to-use API:
@Testcontainers
public class WebhookTest {
    @Container
    ApiServerContainer> container=new ApiServerContainer<>().withAdmissionController(admission -> {
        admission.mutating()
                .withNewWebhook("mutating.example.com")
                .atPort(webhookPort) // Local port of webhook
                .withNewRule()
                .withApiGroups("")
                .withApiVersions("v1")
                .withOperations("CREATE", "UPDATE")
                .withResources("configmaps")
                .withScope("Namespaced")
                .endRule()
                .endWebhook()
                .build();
    });

    // Tests go here
}
The developer only needs to provide the port of the locally running webhook along with some necessary information for setting up in Kubernetes. Kindcontainer then automatically handles the configuration of SSH tunneling, TLS termination, and Kubernetes.
Consider Java
Starting from the simple example of a minimal JUnit test, we have shown how to test custom Kubernetes controllers and operators implemented in Java. We have explained how to use familiar command-line tools from the ecosystem with the help of Fluent APIs and how to easily execute integration tests even in restricted network environments. Finally, we have shown how even the technically challenging use case of testing admission controller webhooks can be implemented simply and conveniently with Kindcontainer.
Thanks to these new testing possibilities, we hope more developers will consider Java as the language of choice for their Kubernetes-related projects in the future.

