- Why I recommend this OnePlus phone over the S25 Ultra - especially at this new low price
- I replaced my laptop with Microsoft's 12-inch Surface Pro for weeks - here's my buying advice now
- This palm recognition smart lock doubles as a video doorbell (and has no monthly fees)
- Samsung is giving these Galaxy phones a big One UI upgrade - here's which models qualify
- 7 MagSafe accessories that I recommend every iPhone user should have
How to activate virtualization-based security and core isolation in Windows 10

Give your PC a little extra security. HVCI and VBS are available in 64-bit versions of Windows 10, but you must turn them on manually. We show you how.
Image: your/Shutterstock
Many of the hardware and software security features Microsoft lists as absolute requirements for a successful Windows 11 installation are already available as options in Windows 10. In some cases, getting these more advanced levels of security is just a matter of turning them on, particularly on newer PCs. One of the more powerful of these security features is the Hypervisor-Protected Code Integrity protocol.
Also known as memory integrity or core isolation protocols, HVIC uses virtualization-based security systems to strengthen code integrity policy enforcement. Recently purchased computers running 64-bit versions of Windows 10 will likely have HVIC up and running by default, but for security’s sake you should check out your system settings to be sure.
SEE: From data to devices: Strengthen your cyber defenses with these security policies (TechRepublic Premium)
How to activate VBS and HVCI in Windows 10
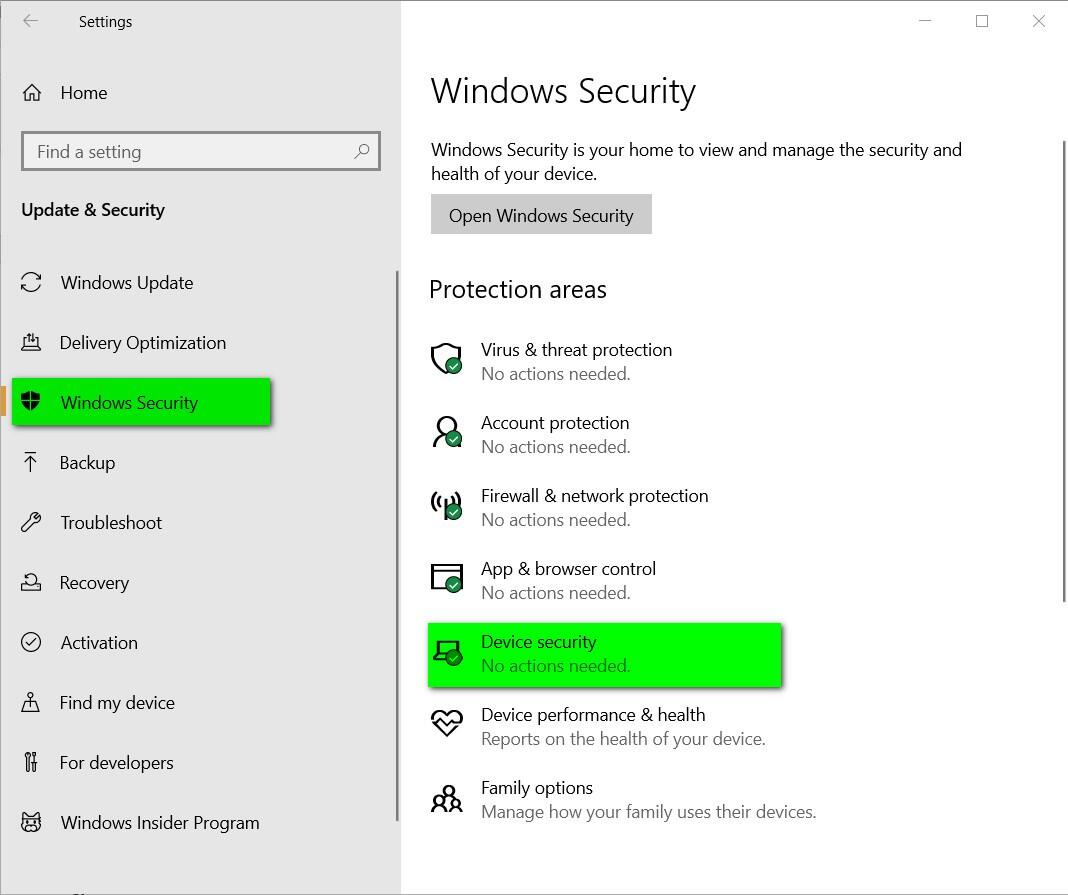
To check if VBS and HVIC are active and running on your Windows 10 personal computer, we will have to delve deeply into the Settings menu. Click or tap the Start Button and select Settings (gear icon). From the Settings menu select Update & Security and then select Windows Security from the navigation bar located in the left windowpane, as shown in Figure A.
Figure A

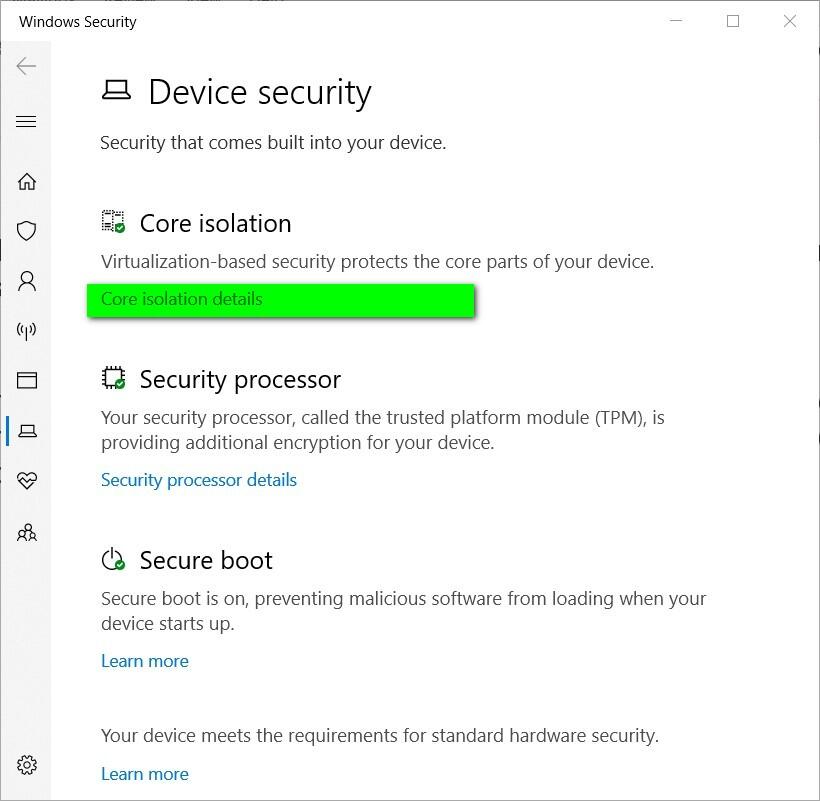
On this screen, click Device Security from the list of items in the right windowpane. As you can see in Figure B, this Settings screen deals with several advanced Windows 10 security protocols.
Figure B

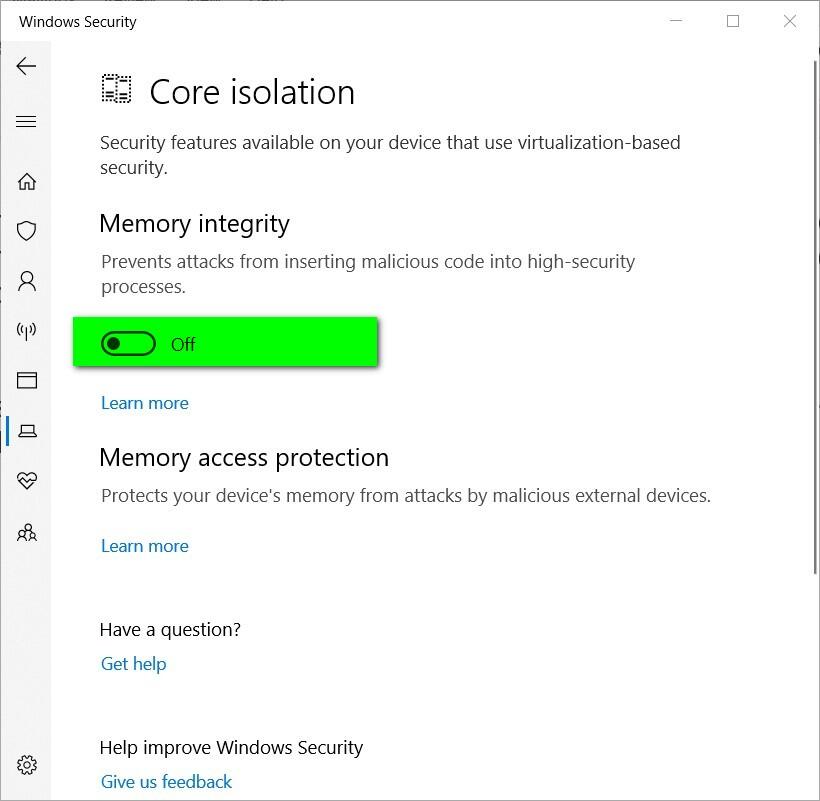
To check the status of HVIC we want to drill down on core isolation, so click the Core Isolation Details link to reveal the details page shown in Figure C.
Figure C

If your Windows 10 PC is capable, it is a good idea to turn the memory integrity features on. Just toggle the switch to the “on” position. After answering a security check, you will have to restart your PC for the protocols to take effect.
Why activate VBS and HVIC?
VBS uses Hyper-V to create and isolate a secure memory region from the operating system, which is used to protect Windows 10 and Windows 11 from security vulnerabilities introduced by legacy support. HVCI takes advantage of VBS to check all kernel-mode drivers and binaries to prevent unsigned drivers and system files from being loaded into system memory. The security protocols also work with application code, catching malware before too much harm can be done.
SEE: Microsoft’s new security tool will discover firmware vulnerabilities, and more, in PCs and IoT devices (TechRepublic)
Unfortunately, HVIC and VBS are only available on systems running 64-bit versions of Windows 10 (and eventually Windows 11). Those of you running 32-bit systems will have to upgrade your software and possibly your hardware to access these core isolation security features. These features also require an updated input-output memory management unit. This is why so many older PCs have been failing the Windows 11 capability tests.
Microsoft’s hard line on updated hardware with advanced security features as a prerequisite for Windows 11 comes in direct response to recent high-profile cyberattacks involving ransomware and other malicious activity. Unfortunately, we are in an arms race with cyber criminals, and it is increasingly difficult for normal everyday users to keep up. If your PC is capable, HVIC and VBS can help stave off at least some of the more common attacks.


