- Why I recommend this OnePlus phone over the S25 Ultra - especially at this new low price
- I replaced my laptop with Microsoft's 12-inch Surface Pro for weeks - here's my buying advice now
- This palm recognition smart lock doubles as a video doorbell (and has no monthly fees)
- Samsung is giving these Galaxy phones a big One UI upgrade - here's which models qualify
- 7 MagSafe accessories that I recommend every iPhone user should have
How to add virtual-machine drive space in Microsoft Server Hyper-V

Virtualization is an essential part of modern IT infrastructure that presents many routine management tasks to sysadmins, among them increasing virtual hard-drive space when necessary. In my line of work, because of expanding log files, scaling for growing processes, and new tasks for existing servers, this is something I do at least once a month.
Here’s how to do itn a Microsoft Server Hyper-V hypervisor running Windows Server 2016 using either Hyper-V Manager or Failover Cluster Manager.
Hyper-V is a Type 1 hypervisor that is installed directly on the underlying hardware and acts as a light operating system on which virtual machines are created. By being installed directly on the hardware, the VM performance is better than it would be with a Type 2 hypervisor that has an intervening operating system between itself and the hardware.
The two main management tools for Hyper-V that can be used to increase virtual hard-drive space are Hyper-V Manager and Failover Cluster Manager. Failover Cluster Manager is only used if you have more than one VM host running and the hosts are clustered, which allows for disaster recovery if one physical machine goes down. It also avoids downtime when performing updates on the host machines. (While clustering is a useful tactic, it doesn’t replace the need for regular backups of everything.)
Hyper-V manager is used to increase the hard-drive space if you only have one physical host or if you have multiple hosts that aren’t clustered.
The following steps show how to increase the space using both Hyper-V Manager and Failover Cluster Manager. They start off with Hyper-V Manager.
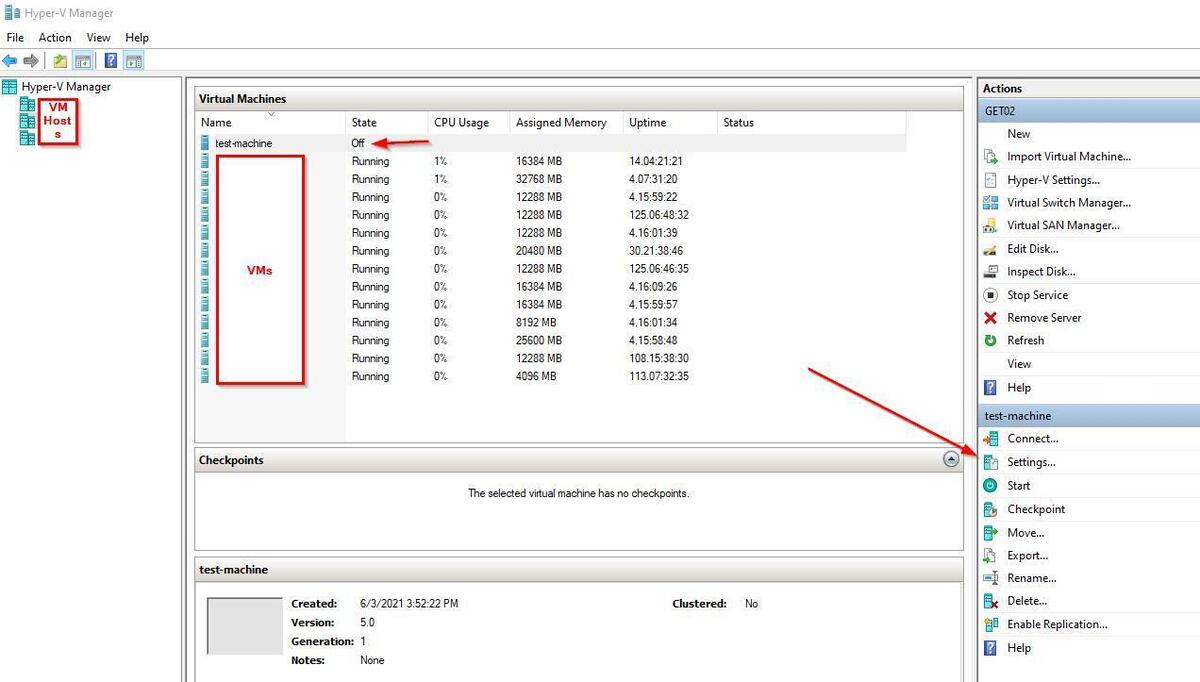
First, shut down the VM on which you are going to increase the hard drive space. To verify that it is shut down, check that the State column entry for the VM reads “Off”. Then click to open Settings in the menu on the right side of the screen.
 Michael A. Flowers Sr.
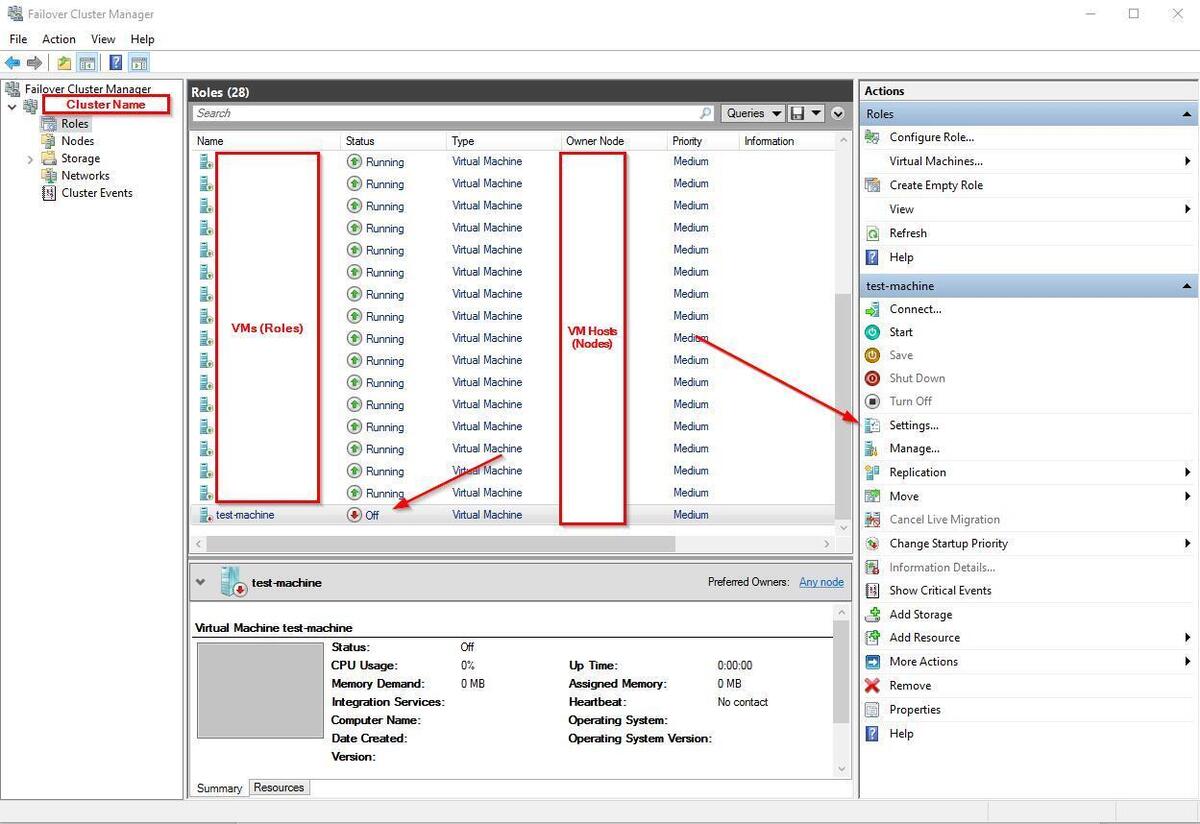
If you are using Failover Cluster Manager, select the role (another name for a VM) that you are working on, then click to open Settings in the menu on the right side of the screen.
 Michael A. Flowers Sr.
This next part is the same whether you are in Hyper-V Manager or Failover Cluster Manager.
On the left-hand menu, select the hard drive you want to expand. This will most likely be a simulated IDE (Integrated Drive Electronics) controller, but it could be an iSCSI (Internet Small Computer Systems Interface) controller instead, depending on which you chose when setting up the drive. Click on Edit underneath the virtual hard-disk path in the Media section of the dialog box.
 Michael A. Flowers Sr.
Verify that the disk location is correct. Click Next.
 Michael A. Flowers Sr.
On the Choose Action screen select Expand from the options. Click Next.
 Michael A. Flowers Sr.
On the Configure Disk screen you need to enter in the size in GB that you want the hard drive to be after the expansion. Click Next.
 Michael A. Flowers Sr.
Finally, review the summary to make sure everything is correct, and if it is, click Finish.
 Michael A. Flowers Sr.
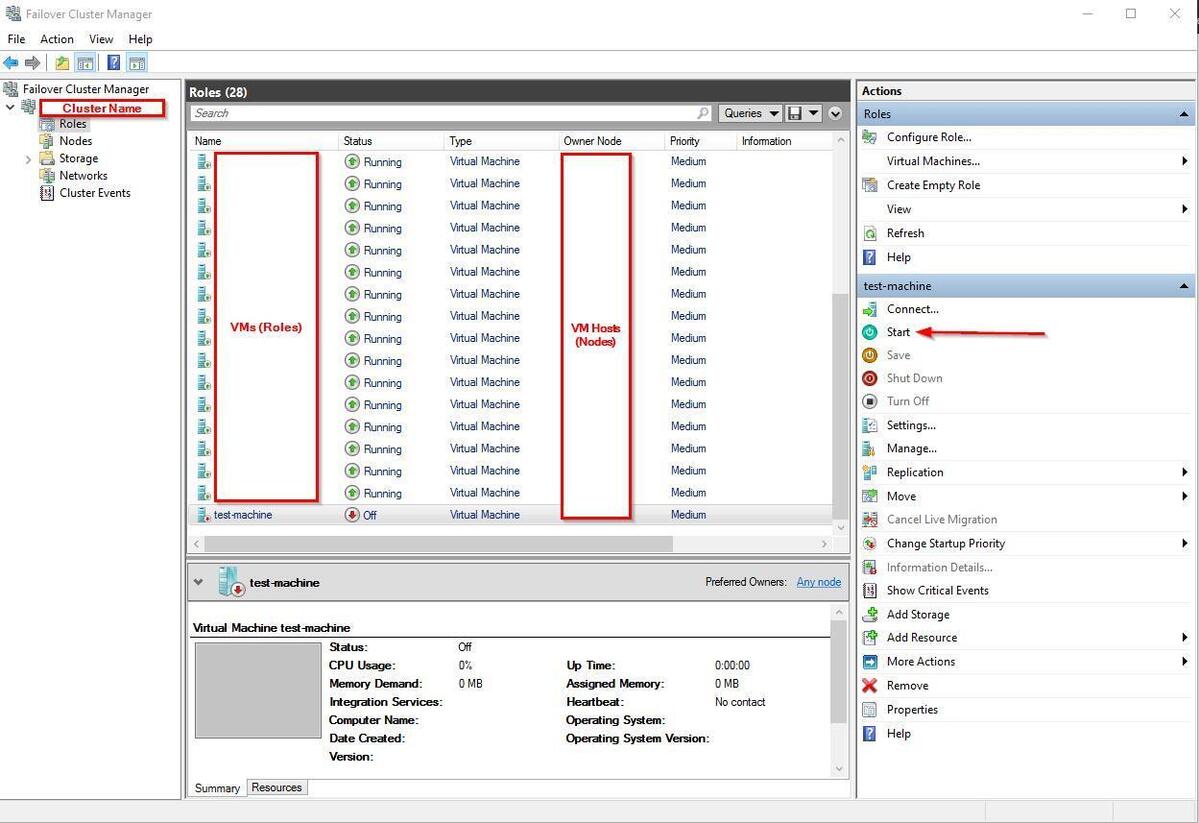
Back in either Hyper-V Manager or Failover Cluster Manager, select the VM you are working with then click Start to turn it back on. In both management tools the Start button is on the right-hand menu where the Settings button was. Here’s how it looks in Hyper-V Manager:
 Michael A. Flowers Sr.
And here it is in Failover Cluster Manager:
 Michael A. Flowers Sr.
Using Windows Server 2016, open the Server Manger and navigate to Tools in the top right-hand corner then click Computer Management on the drop-down menu.
 Michael A. Flowers Sr.
Under Computer Management in the left-hand menu, click on Navigate to Disk Management.
 Michael A. Flowers Sr.
In the bottom half of the dialog box is a section that tells how much of your hard-drive partition is unallocated. (In the image below, that unallocated space is partially blocked by the dropdown menu.) Right click on the hard drive partition and select Extend Volume.
 Michael A. Flowers Sr.
The Extend Volume Wizard dialog box will appear. Click Next.
 Michael A. Flowers Sr.
On the next screen all of the unallocated space will automatically be added to the Selected side of the space-selection area. Make sure the amount of space being added is correct. Click Next.
 Michael A. Flowers Sr.
Click “Finish” to complete the expansion.
Afterwards you should see your expanded hard drive with the new space reflected.
Adding space to virtual hard drives is a simple task that it is yet another benefit to having virtual machines.
Copyright © 2021 IDG Communications, Inc.

