- I recommend the Pixel 9 to most people looking to upgrade - especially while it's $250 off
- Google's viral research assistant just got its own app - here's how it can help you
- Sony will give you a free 55-inch 4K TV right now - but this is the last day to qualify
- I've used virtually every Linux distro, but this one has a fresh perspective
- The 7 gadgets I never travel without (and why they make such a big difference)
How to Associate an Apple ID with a Second iPhone That Has Completed Setup

Learn how to easily associate an Apple ID with a second iPhone to access all your apps, media and iCloud services seamlessly with this step-by-step guide.
There are several reasons you might use two iPhones with the same Apple ID. You might link a second iPhone to your Apple ID to permit sharing files, contacts, calendar information, photos, videos and similar information with a business partner or spouse. You might also wish to employ a second, maybe older, iPhone associated with your Apple ID to enable using an older mobile device when conducting field work or working within more hostile environments that could damage or blemish a new iPhone 15 Pro Max, in which you’ve invested almost $1,600. In such cases, it’s likely you might use the same Apple ID for two devices.
Start the process by linking the correct Apple ID
Using a second iPhone previously associated with a different Apple ID, you should begin by first logging the old Apple ID out. Then you can log in using your Apple account to associate the second iPhone with your Apple ID.
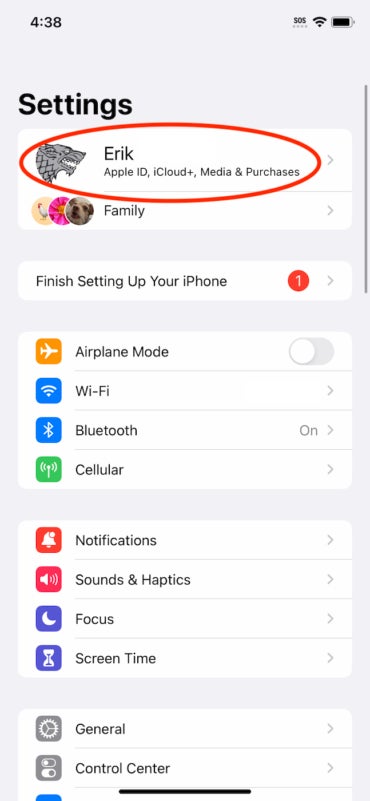
To associate your Apple ID with an iPhone that’s already completed the setup routine, tap Settings, then tap Sign In To Your iPhone, which appears at the top of the Settings screen (Figure A).
Figure A
The iPhone will present Apple ID setup options similar to those displayed when setting up a new iPhone. The two options include Use Another Apple Device and Sign In Manually.
Using the manual method provides the most flexibility when connecting your Apple ID to a second iPhone. Begin by tapping the Sign In Manually box. Next, the iPhone will prompt you to enter your Apple ID. Enter the email address or telephone number associated with the Apple ID and then tap Continue. The Password box will appear. Enter the password and then tap Done.
Continue by confirming your identity
Apple will send a notification and verification code to the other iPhone associated with your Apple ID; this step helps confirm your identity while also permitting the second iPhone to join your Apple account and synchronize the information you specify. Enter the six-digit verification code Apple sends to the other authorized device (the first iPhone) on the second (new) iPhone and then tap Done to proceed.
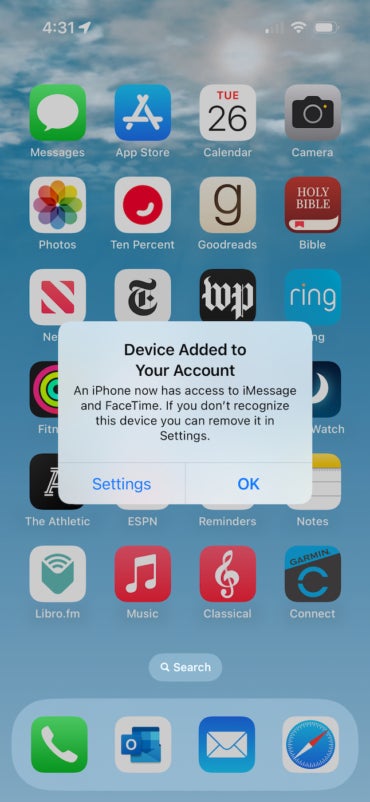
The second iPhone will display your Apple ID within the Settings menu (Figure B). For further assurance, the other devices associated with your Apple ID will display a notification stating the new device has been added to your account (Figure C).
Figure B

Figure C

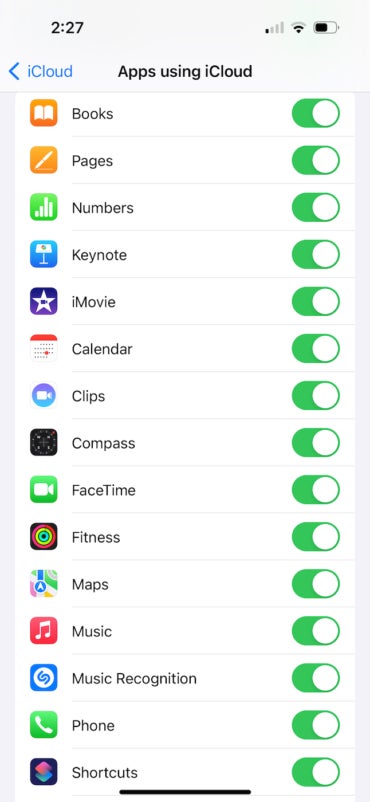
Because you can use two iPhones with the same Apple ID, linking your Apple account to two iPhones enables accessing and synchronizing your documents, contacts, spreadsheets, photos, calendar information, videos and other information on two different handsets. Further, by toggling the respective radio buttons on and off within Settings’ iCloud options (reached by tapping Settings, selecting your iCloud account name and tapping iCloud), you can customize which settings, information and apps on that device synchronize data with your Apple account (Figure D).
Figure D

Review iCloud settings carefully to ensure the second iPhone works as intended
Because Apple offers so much flexibility with which apps can be synchronized using your Apple ID and corresponding iCloud services, you can share as little or as much information between your Apple ID and the second iPhone as you like. So take time to review the iCloud options on the second handset. Remember, if data from a particular app isn’t coming over from the first iPhone, check the first iPhone to confirm its iCloud settings (Figure D) are properly enabled to synchronize that information with your Apple iCloud account.

