- This tiny Bluetooth speaker delivers loud, distortion-free sound - and it's on sale
- 2025 Cyber Security Predictions: Navigating the Ever-Evolving Threat Landscape
- Not Just Another List of Top 10 Metrics You Should Measure
- My new favorite headphones for swimming come bundled in a unique charging accessory
- Why I recommend this Windows laptop to creatives and professionals - even if it's meant for gamers

How to connect a client to the open-source Pritunl VPN

Now that you have your Pritunl VPN server up and running, Jack Wallen shows you how to connect the client.
Image: iStock/Melpomenem
In a recent how-to (How to install the Pritunl VPN server on Ubuntu Server 20.04), I walked you through the process of installing the Pritunl VPN server on Ubuntu 20.04. This time around, we’re going to install the Pritunl client on Ubuntu Desktop 21.04 and connect it to the server. Of course, you can also install the client on macOS and Windows, and the connection process is the same on all platforms. But since Linux is my go-to operating system, I’ll be demonstrating the steps on that OS.
SEE: Security incident response policy (TechRepublic Premium)
What you’ll need
First off, you must have the Pritunl VPN server up and running, so make sure you go through the steps in the article listed above. You’ll also need a client machine (in this case Ubuntu Desktop 21.04), which can be running Linux, macOS, or Windows. For the Linux installation, you’ll also need a user with sudo privileges. Let’s get to work.
How to install the Pritunl client
We’ll be using the electron version of the Pritunl client. Open a terminal window and download the necessary GPG keys with the command:
sudo apt-key adv --keyserver hkp://keyserver.ubuntu.com --recv 7568D9BB55FF9E5287D586017AE645C0CF8E292A
Once the key is installed, add the repository with the command:
sudo nano /etc/apt/sources.list.d/pritunl.list
In that file, paste the following:
deb https://repo.pritunl.com/stable/apt focal main
Although we’re working with 21.04, Pritunl doesn’t yet have a repository for the release. Fortunately, the client released for 20.04 works just fine. Save and close the file.
Update apt with the command:
sudo apt-get update
Install the client with the command:
sudo apt-get install pritunl-client-electron -y
How to download your Pritunl fingerprint
Before you can connect the client, you must first download your Pritunl finger. To do that, log into the Pritunl server web interface, go to Users, and then click the download button for your user (Figure A).
Figure A

To download your user profile, click the downward-pointing arrow.
Once you’ve saved the profile to your desktop, extract it with the command:
tar xvf NAME.tar
Where NAME is the name of the profile.
You should now see a new file ending with the .ovpn extension. Open the Pritunl client and click Import Profile (Figure B).
Figure B

The Pritunl client is a no-frills, user-friendly tool for connecting to the server.
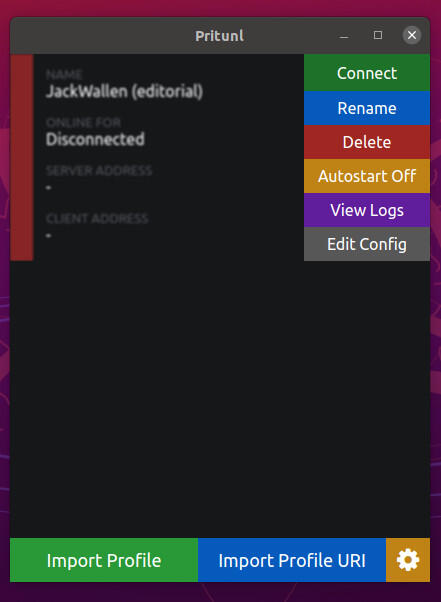
Locate the .ovpn file and import it into the client. You should now see the name of the profile listed. On that profile, click the Hamburger menu and select Connect (Figure C).
Figure C
Connecting to the Pritunl server from the client.
You will be prompted for the PIN you created for your profile on the server. Enter the PIN and click OK. Once the connection is made, your profile will be listed as Online (Figure D).
Figure D
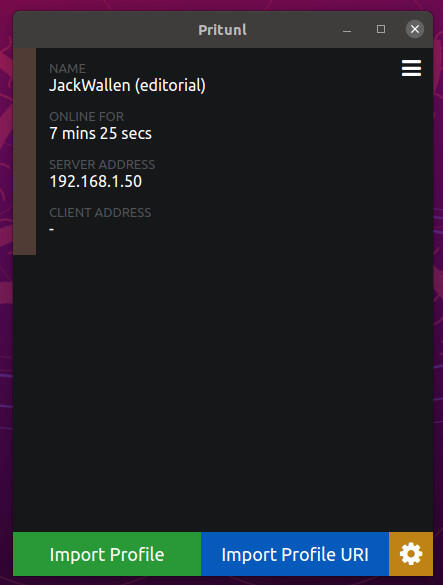
Our client has successfully connected to the server.
Congratulations, you are now connected to the Pritunl VPN server. When you’ve finished, click the Hamburger menu and select Disconnect. That’s all there is to it.
Subscribe to TechRepublic’s How To Make Tech Work on YouTube for all the latest tech advice for business pros from Jack Wallen.

Cybersecurity Insider Newsletter
Strengthen your organization’s IT security defenses by keeping abreast of the latest cybersecurity news, solutions, and best practices.
Delivered Tuesdays and Thursdays
