- I recommend the Pixel 9 to most people looking to upgrade - especially while it's $250 off
- Google's viral research assistant just got its own app - here's how it can help you
- Sony will give you a free 55-inch 4K TV right now - but this is the last day to qualify
- I've used virtually every Linux distro, but this one has a fresh perspective
- The 7 gadgets I never travel without (and why they make such a big difference)

How to connect Ubuntu Linux Desktop 21.04 to an Active Directory domain

Canonical has made it easy for admins to join Ubuntu Desktop to Active Directory domains. Jack Wallen walks you through the steps.
Image: iStock/LeoWolfert
Ubuntu 21.04 was made available last month, and it has been quite the hit with both end users and businesses. Although you won’t find a massive amount of new features, what is there should be considered a significant step forward for enterprise and other business use cases.
One particular feature that network and security admins will greatly appreciate is the ability to easily connect Ubuntu Desktop to an Active Directory domain. With this newly added ability, Linux desktops have become a more viable option for companies. The added benefit of this is users will be working on a more reliable and secure platform.
How do you join a new instance of Ubuntu Desktop to an Active Directory domain? I’m going to show you.
SEE: Security incident response policy (TechRepublic Premium)
What you’ll need
To make this work, you need to do a fresh install of Ubuntu Desktop, because it is during the installation the connection to Active Directory is made. So download an ISO of Ubuntu Desktop 21.04, burn it to a USB or create a new virtual machine, and prepare to connect.
How to connect Ubuntu to the domain
During the installation of Ubuntu, you’ll get to the user creation screen. On that screen, go ahead and fill out the user information as you would normally do, but make sure to click the checkbox for Use Active Directory (Figure A).
Figure A
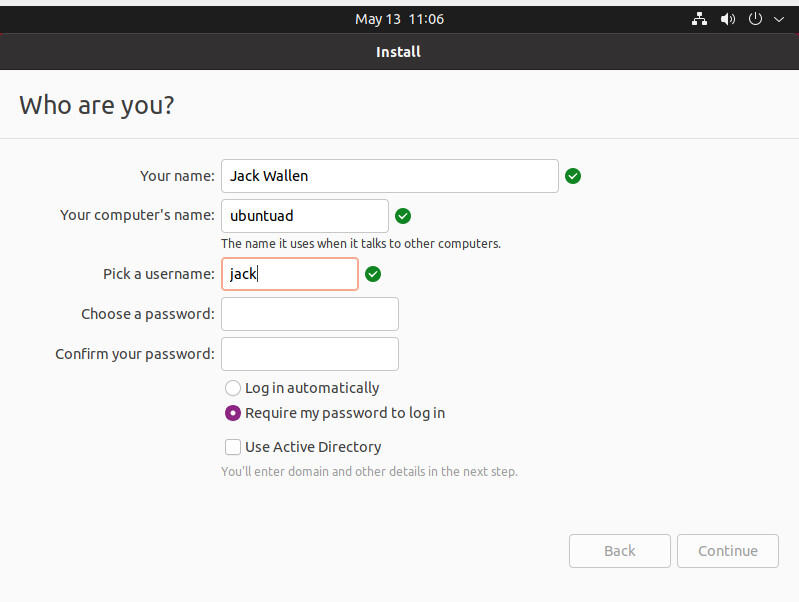
Enabling the Active Directory connection during the installation of Ubuntu Desktop 21.04.
Click Continue.
In the next screen, fill out the domain and then click Test Connection (Figure B).
Figure B

Configuring Active Directory from the Ubuntu Desktop 21.04 installer.
You should get a green check when the connection tests out. Once you see that, fill out the Domain Administrator and enter the password for that admin. With that information complete, click Continue and the installation will complete. Restart the machine and log in.
Once you’ve logged in, open a terminal and issue the command:
realm discover REALM
Where REALM is the name of the realm you’ve joined. You should see in the output, the details for the realm (Figure C).
Figure C
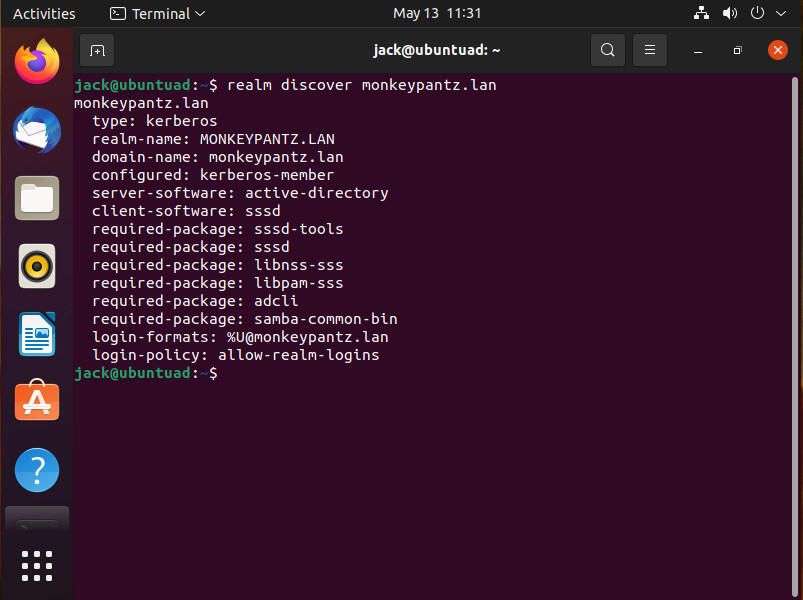
I’ve joined a new instance of Ubuntu Desktop to the MONKEYPANTZ.LAN realm.
Now that the Ubuntu Desktop machine has successfully joined the domain, you can then log in with users (who are a member of the domain) at the desktop login screen in the form of USER@REALM, where USER is the user with an Active Directory account and REALM is the realm the computer has joined.
Congratulations, you can now deploy Linux as a viable desktop solution on your company network. You can now more easily control the users that can log in to those desktops, with strict company policies.
Subscribe to TechRepublic’s How To Make Tech Work on YouTube for all the latest tech advice for business pros from Jack Wallen.

Cybersecurity Insider Newsletter
Strengthen your organization’s IT security defenses by keeping abreast of the latest cybersecurity news, solutions, and best practices.
Delivered Tuesdays and Thursdays
