- Key Cybersecurity Considerations for 2025
- Stock your Kindle for summer: Get up to 93% off popular reads during Amazon's Book Sale
- I replaced my TV with a 4K UST projector - and the visual upgrade was worth it
- This Amazon Fire TV soundbar gave me room-filling audio without breaking the bank
- I found a Garmin smartwatch that's ideal for those who don't like the rugged design
How to enable secure DNS on your Chromebook

Jack Wallen walks you through the process of using DNS-over-HTTPS on your Chromebook for a more secure experience.
Image: Getty Images/iStockphoto
With good reason, you take your
Chromebook
everywhere you go. It’s simple to use, it’s secure and it’s blazing fast, but the security of the Chromebook isn’t always guaranteed—especially when you’re working on a public network. You’ve probably connected that laptop to coffee shop networks, where there’s either no password, an easy password or zero guarantees of the level of security applied to the Wi-Fi.
What do you do? One thing you most certainly should do is configure both Chrome OS and Chrome to use secure DNS. By doing this, all of your DNS queries are encrypted, so you don’t have to worry so much that some ne’er-do-well is listening in on the packets you send out.
How do you do this? It’s quite simple. Let me show you.
SEE: Electronic communication policy (TechRepublic Premium)
What you’ll need
The only thing you’ll need for this is an updated Chromebook, running at least version 83 of chrome. Given that the latest release on stable Chrome OS is 89.0.4389.130 (as of this writing), you should be good to go.
How to enable Secure DNS in Chrome
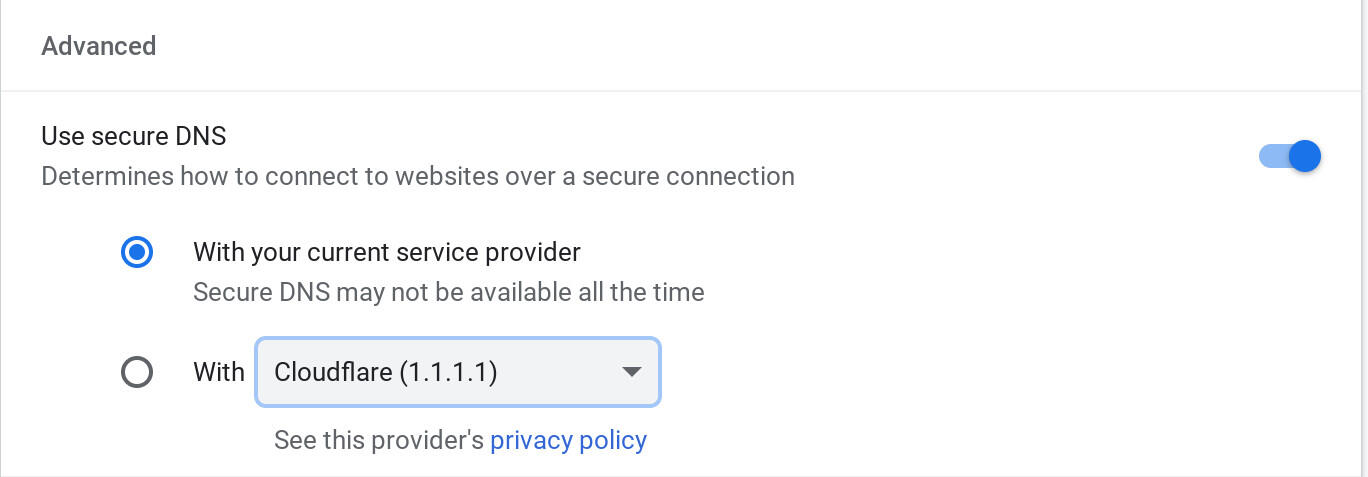
The first thing we’ll do is enable Secure DNS in Chrome, which uses DNS-over-HTTPS to encrypt all DNS traffic. To do this, open Chrome on your Chromebook and type chrome://settings/security in the address bar. Look for Use Secure DNS, select With and then choose Cloudflare (1.1.1.1) from the drop-down list (Figure A).
Figure A

Switching to Cloudflare secure DNS in Chrome.
There’s no need to save or restart, as your changes are instant and automatic.
How to change DNS providers in Chrome OS
Although Chrome OS doesn’t include a setting for global DNS-over-HTTPS, we can at least change the DNS settings for individual networks, such that they use the same DNS as Chrome. Although most of what you do on your Chromebook will be handled via Chrome, there are instances where you might have installed a Linux app or some other tool that doesn’t go through Chrome. That being the case, you’ll want to have the same DNS used for those instances.
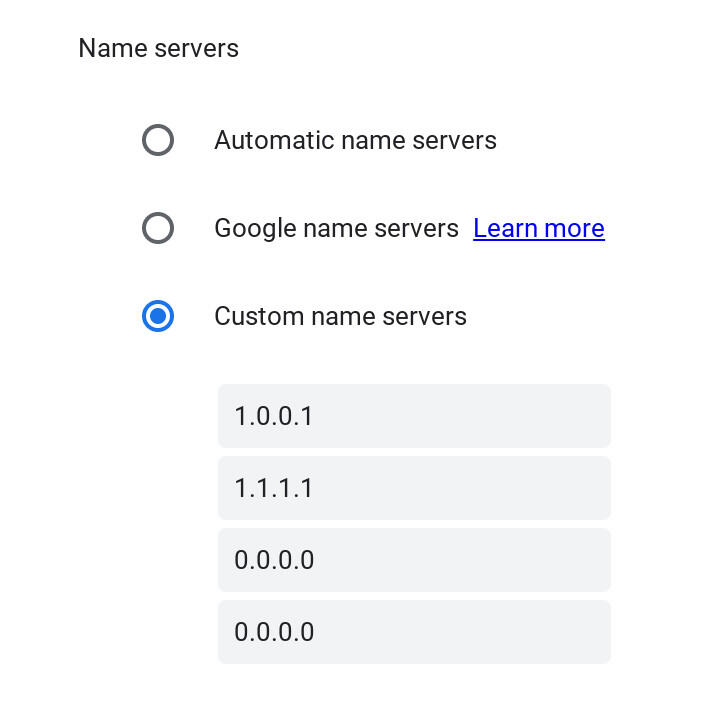
To change the DNS for your currently connected network, click the system tray to open the popup, and then click the gear icon at the top. Click Network and then click Wi-Fi at the top of the window. On the resulting page, click the network you are currently using and then scroll down and click Network, which will reveal the Name Servers setting (Figure B).
Figure B

The Name Servers setting for the connected wireless network.
Check Custom name servers and type 1.0.0.1 for the primary and 1.1.1.1 for the secondary (which are CloudFlare’s DNS servers).
That’s it. You now have a setup where both Chrome and Chrome OS are using the same encrypted DNS servers. Your Chromebook should now be a bit more secure than it was.
You’ll want to go through this same process for every wireless network you use with your Chromebook.
Subscribe to TechRepublic’s How To Make Tech Work on YouTube for all the latest tech advice for business pros from Jack Wallen.


