- Vulnerability Scanning vs. Penetration Testing
- Why your business needs a cloud-based print management solution
- McAfee Dominates AV-Comparatives PC Performance Test | McAfee Blog
- The cyber pandemic: AI deepfakes and the future of security and identity verification
- Transform the modern data center: From today to the future

How to work with Vault Secrets Engines

Jack Wallen shows you how to create both local and AWS secrets engines with Hashicorp’s Vault.
Image: Sarah Pflug/Burst
One of the biggest security issues in development is leaving secrets within code. With passwords, encryption keys and API keys left in code, hackers could easily gain access to your data, your network, or the services you use. To that end, it’s imperative that developers make use of all the tools available to secure their code.
One such tool is HashiCorp’s Vault, which is a command line tool to manage the secrets needed in your code. In my previous Vault tutorial, How to use the Vault command line tool to store your code secrets, I showed you how to install the tool and how to store a secret in the Vault server. This time around I’m going to show you how to work with Vault Secrets Engines, which are components that store, generate, or encrypt data and can connect to other services to generate dynamic credentials on demand.
It’s important to make sure you’ve gone through the original article, so you have the Vault server properly running on your machine.
SEE: Identity theft protection policy (TechRepublic Premium)
How to enable a new Secrets Engine
If you issue the command vault secrets list you will see four or five secrets engines available, such as:
-
cubbyhole
-
identity
-
kv
-
secret
Let’s enable the kv secrets engine with the command:
vault secrets enable -path=kv kv
If you issue the command vault secrets list, you’ll see kv listed twice (Figure A).
Figure A
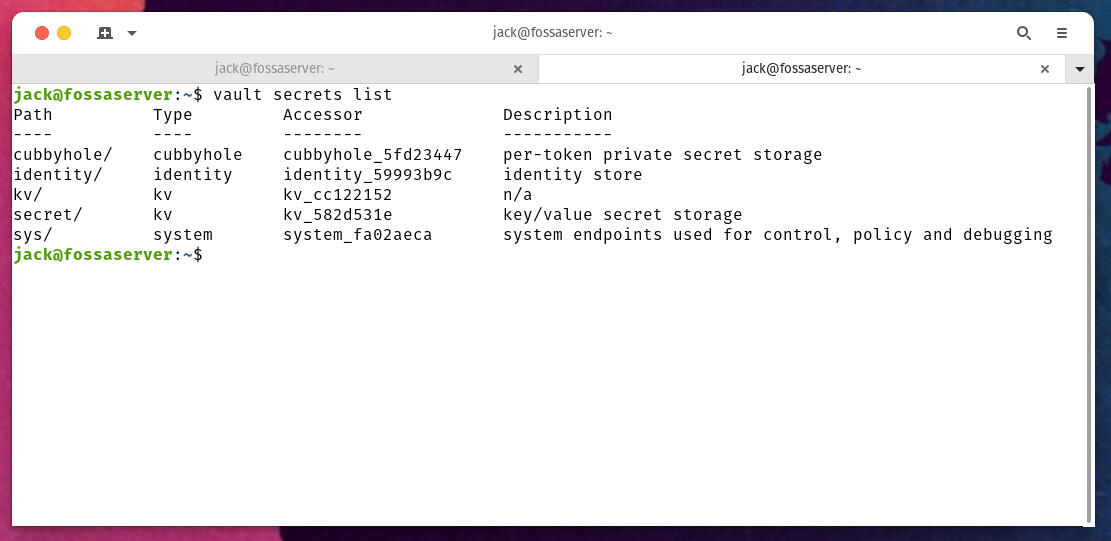
We’ve enabled a new kv secrets engine, which is located in /kv (as per our command above).
How to add a new secret to the Secrets Engine
Let’s add the key pair:
password = 2112Bu2BrUSh
We do that with the command:
vault kv put kv/password target=2112Bu2BrUSh
To verify we’ve added the new key, issue the command:
vault kv get kv/password
You should see the new key pair listed (Figure B).
Figure B

Our new key pair addition was successful.
You can continue adding new secret key pairs like so:
vault kv put kv/AWS-WEB1 value="nEveRuSeApAsSwOrDlIkEtHiS"
To read the above secret, you’d use the command:
vault kv get kv/AWS-WEB1
To find out all of the keys you’ve added, issue the command:
vault kv list kv/
At this point you should only see:
password
AWS-WEB1
How to enable the AWS Secrets Engine
Speaking of AWS, let’s enable the AWS Secrets Engine. What this Secrets Engine will do is communicate with AWS to generate dynamic secrets for you to use. To do that, issue the command:
vault secrets enable -path=aws aws
Now that we’ve enabled the AWS Secrets Engine, we need to configure it to use your AWS access key ID. To create an access key log into the IAM console and go to Users | Security Credentials | Create Access Key. Once you’ve created it, you’ll have an Access Key ID and a Secret Access Key.
You’ll then need to set both the ID and the KEY with the commands:
export AWS_ACCESS_KEY_ID=<id>
export AWS_SECRET_ACCESS_KEY=<key>
Where id is the Access Key ID and key is the Secret Access Key.
Finally, you configure the AWS engine with the command:
vault write aws/config/root access_key=$AWS_ACCESS_KEY_ID secret_key=$AWS_SECRET_ACCESS_KEY region=us-east-1
Make sure you set your region to the one you use with AWS.
How to create a role
Next, you must create a role so Vault knows what permissions, groups and policies are to be associated with a new IAM user. You will need to be familiar with AWS managed policies to make this work properly. For example, let’s create a new role, named REGIONS that allows enabling and disable AWS regions.
The IAM policy for this is:
{
    "Version": "2012-10-17",
    "Statement": [
        {
            "Sid": "EnableDisableHongKong",
            "Effect": "Allow",
            "Action": [
                "account:EnableRegion",
                "account:DisableRegion"
            ],
            "Resource": "*",
            "Condition": {
                "StringEquals": {"account:TargetRegion": "ap-east-1"}
            }
        },
        {
            "Sid": "ViewConsole",
            "Effect": "Allow",
            "Action": [
                "aws-portal:ViewAccount",
                "account:ListRegions"
            ],
            "Resource": "*"
        }
    ]
}
To create the role, the command would be:
vault write aws/roles/REGIONS
        credential_type=iam_user
        policy_document=-<<EOF
{
    "Version": "2012-10-17",
    "Statement": [
        {
            "Sid": "EnableDisableHongKong",
            "Effect": "Allow",
            "Action": [
                "account:EnableRegion",
                "account:DisableRegion"
            ],
            "Resource": "*",
            "Condition": {
                "StringEquals": {"account:TargetRegion": "ap-east-1"}
            }
        },
        {
            "Sid": "ViewConsole",
            "Effect": "Allow",
            "Action": [
                "aws-portal:ViewAccount",
                "account:ListRegions"
            ],
            "Resource": "*"
        }
    ]
}
EOF
With the AWS Secrets Engine enabled and configured, and a new role created, we can now generate a secret key pair for the role with the command:
vault read aws/creds/REGIONS
Vault will connect to AWS to generate a new IAM user and generate an access key pair for the REGIONS role.
Congratulations, you’ve created your first Secrets Engines and generated key pairs.
Understand, everything we’ve done so far is in a test environment. Next time around, we’ll deploy the Vault server to an actual production environment.
Subscribe to TechRepublic’s How To Make Tech Work on YouTube for all the latest tech advice for business pros from Jack Wallen.

Cybersecurity Insider Newsletter
Strengthen your organization’s IT security defenses by keeping abreast of the latest cybersecurity news, solutions, and best practices.
Delivered Tuesdays and Thursdays
