
Taking Your App Live with Docker and the Uffizzi App Platform – Docker Blog

Tune in December 10th 1pm EST for our
Live DockTalk: Simplify Hosting Your App in the Cloud with Uffizzi and Docker
We’re excited to be working with Uffizzi on this joint blog. Docker and Uffizzi have very similar missions that naturally complement one another. Docker helps you bring your ideas to life by reducing the complexity of application development and Uffizzi helps you bring your ideas to life by reducing the complexity of cloud application hosting.
This blog is a step-by-step guide to setting up automated builds from your Github repo via Docker Hub and enabling Continuous Deployment to your Uffizzi app hosting environment.

Prerequisites
To complete this tutorial, you will need the following:
- Free Docker Account
- An IDE or text editor to use for editing files. I would recommend VSCode
- Free Uffizzi App Platform Account
- Free Github Account
Docker Overview
Docker is an open platform for developing, shipping, and running applications. Docker containers separate your applications from your infrastructure so you can deliver software quickly.
With Docker, you can manage your infrastructure in the same ways you manage your applications. By taking advantage of Docker’s methodologies for shipping, testing, and deploying code quickly, you can significantly reduce the delay between writing code and running it in production.
Uffizzi App Platform Overview
Uffizzi is a Docker-centric cloud application platform. Uffizzi helps Devs by reducing the complexity of hosting their app in the cloud. Uffizzi automates over a dozen cloud processes and provides push-button app hosting environments that are reliable, scalable, and secure.
With Uffizzi you can set up and deploy your application directly from Docker Hub or, as we’ll show in this blog, from Github through Docker Hub’s automated build process. Uffizzi is built upon the open source container orchestrator Kubernetes and allows you to leverage this powerful tool without the complexities of managing cloud infrastructure.
Fork and Clone Example Application
We’ll use an example “Hello World” application for this demonstration, but you can use this workflow with any app that answers HTTP requests.
Login to your GitHub account and “fork” your own copy of this example repository: https://github.com/UffizziCloud/hello-world
To fork the example repository, click the Fork button in the header of the repository:

Wait just a few moments for GitHub to copy everything into your account. When it’s finished, you’ll be taken to your forked copy of the example repository. You can read more about forking GitHub repositories here: https://guides.github.com/activities/forking/
Of course to actually make any changes you’ll need to “clone” your new Git repository onto your workstation. This will be a little different depending on which operating system your workstation is running, but once you have Git installed, `git clone` will usually succeed. The green “Code” button in your repository header provides the URL to clone. You could also use GitHub’s desktop application. You can learn more about Git here: https://guides.github.com/introduction/git-handbook/

Review Code and Dockerfile
Confirm that you have a viable clone by reviewing some of the files within, especially the `Dockerfile`. This file is required to build a Docker image for any application, and it will later be used to automatically build and deploy your new container images. This example `Dockerfile` is extremely simple; your application may require a more sophisticated `Dockerfile`. You can read more about `Dockerfile` anatomy here: https://docs.docker.com/engine/reference/builder/
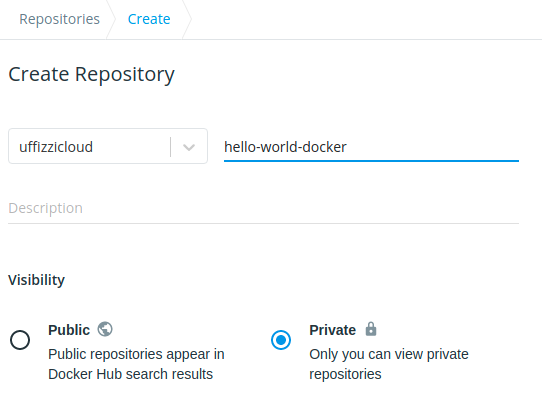
Create Private Docker Hub Repository
Next, we need somewhere for those built images to reside where Uffizzi can find them. Log in to your Docker Hub account and click on Repositories and then Create Repository.

Be sure to create a Private Repository (not Public) for later Continuous Deployment to Uffizzi.
And now’s a good time to link your GitHub account and add a Build Rule to configure automatic building. Click the GitHub logo and authorize Docker to view your GitHub repository. Click the blue plus sign and create a Build Rule for your `master` branch.
